
Equipping in-game characters with distinctive outfits or attire allows avid gamers to convey their identification on a digital stage. To take action, gamers should purchase tokens (in-game forex) that they’ll later use to buy outfits throughout the recreation. However how “distinctive” are the gadgets inside conventional video games? Effectively, not as a lot as the exceptional elements utilized in blockchain gaming, particularly, NFTs. Shopping for NFT outfits in-game opens up a brand new stage of depth to the blockchain gaming expertise. For instance, these NFT outfits will be purchased throughout the recreation, not only for gamers to personal or promote but in addition traded on NFT marketplaces. For builders, implementing a “purchase NFT outfits in-game” characteristic is vital. Because of Moralis’ Unity SDK, you’ll be able to simply implement all types of Web3 options, together with a purchase NFT outfits part!
So far as Web3 video games go, issues normally begin with Web3 authentication. That is the place Moralis’ Web3 Auth API makes the verification course of extraordinarily simple. It allows you to have an environment friendly Web3 login technique established in minutes. Consequently, customers can use any of their favourite crypto wallets to authenticate themselves. Additionally, Moralis is all about cross-platform and cross-chain interoperability. Therefore, it allows you to use your favourite legacy instruments and simply implement Web3 performance to quite a few purposes. Accordingly, these purposes can develop into dapps (decentralized purposes). Moreover, Moralis allows you to concentrate on numerous blockchains and develop your attain to future-proof your work. With that mentioned, we invite you to create your free Moralis account and observe our lead. As such, you’ll learn to create your individual occasion of our instance recreation that lets gamers purchase NFT outfits.
Purchase NFT Outfits – Demo of Our Instance Web3 Sport
Earlier than we transfer on, we need to guarantee that you’ve got a transparent image of what to anticipate from our instance venture. Thus, let’s take a look at a demo of our Web3 recreation that allows gamers to purchase NFT outfits. Like most dapps, our recreation begins with Web3 authentication. On the next display screen, gamers must click on on “join”:
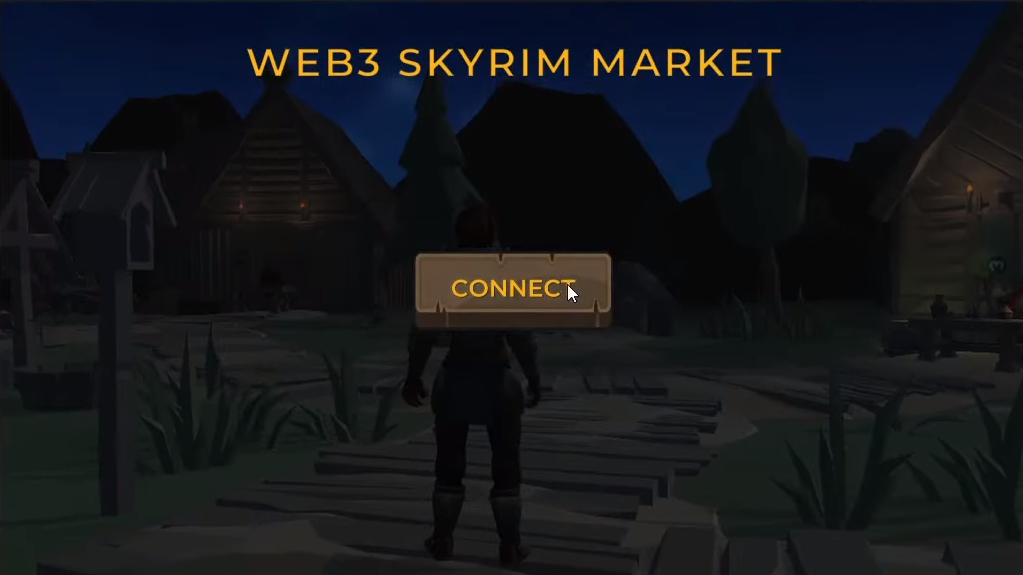
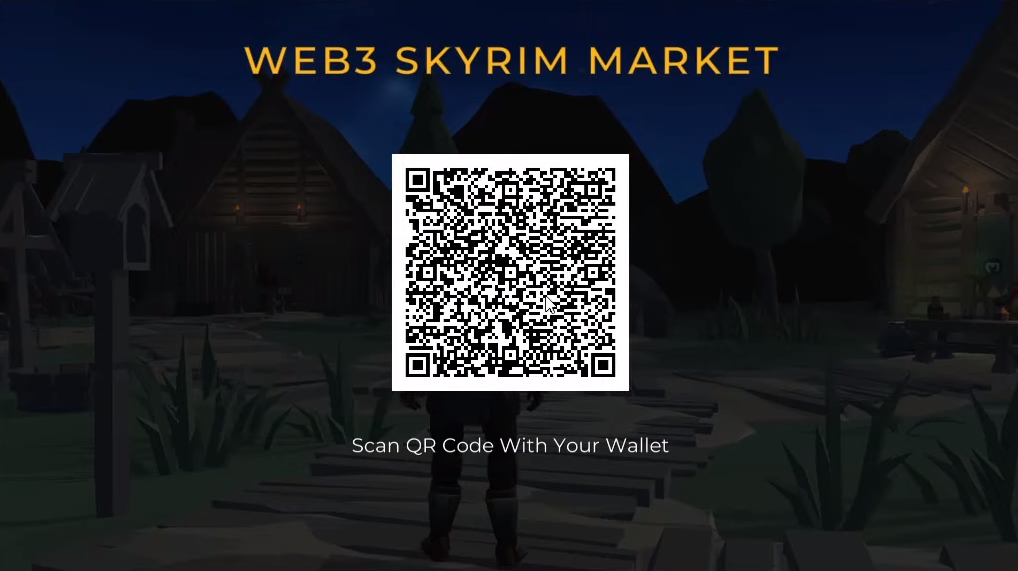
The above screenshot additionally contains the title of our instance recreation: “Web3 Skyrim Market”. As soon as the gamers click on the “join” button, a QR code will likely be displayed. As such, they should use their favourite cell crypto pockets to scan the code and authenticate themselves:
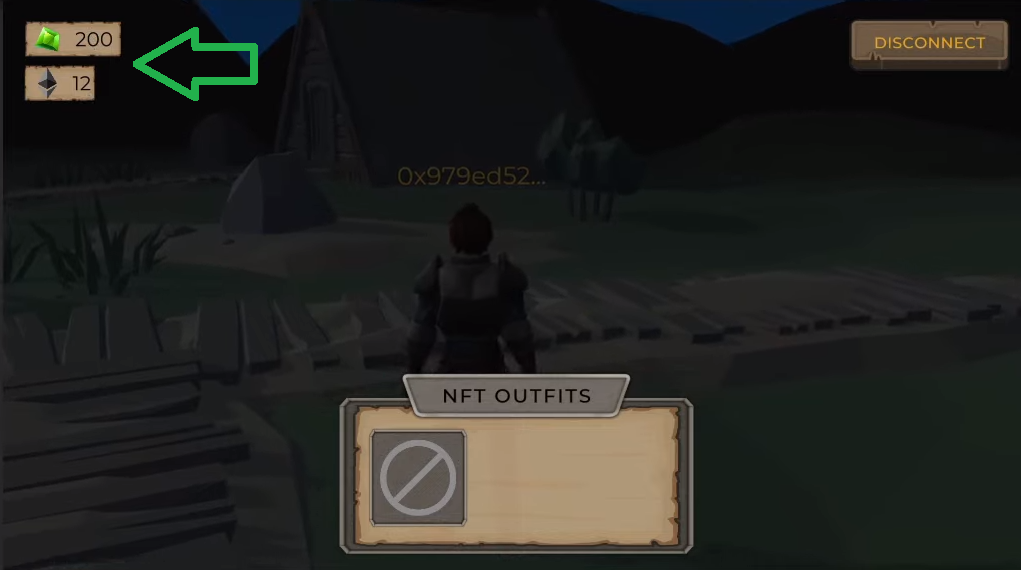
After confirming their login, customers can management the avatar. Furthermore, they’ll see the preliminary a part of their wallets’ handle displayed above the character’s head:

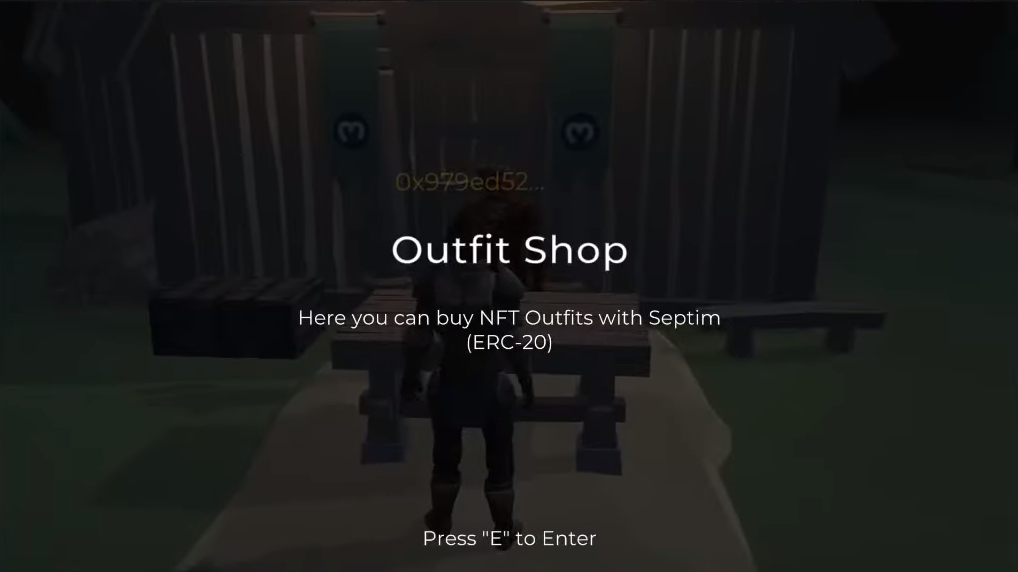
Since it is a night time scene, it’s a bit darkish. In fact, gamers can discover the scene freely. By doing so, they’ll quickly uncover two store counters. Moreover, as quickly as their avatar enters these counters’ collider, they see extra particulars. Within the case of our “trade” counter, they see the next display screen:
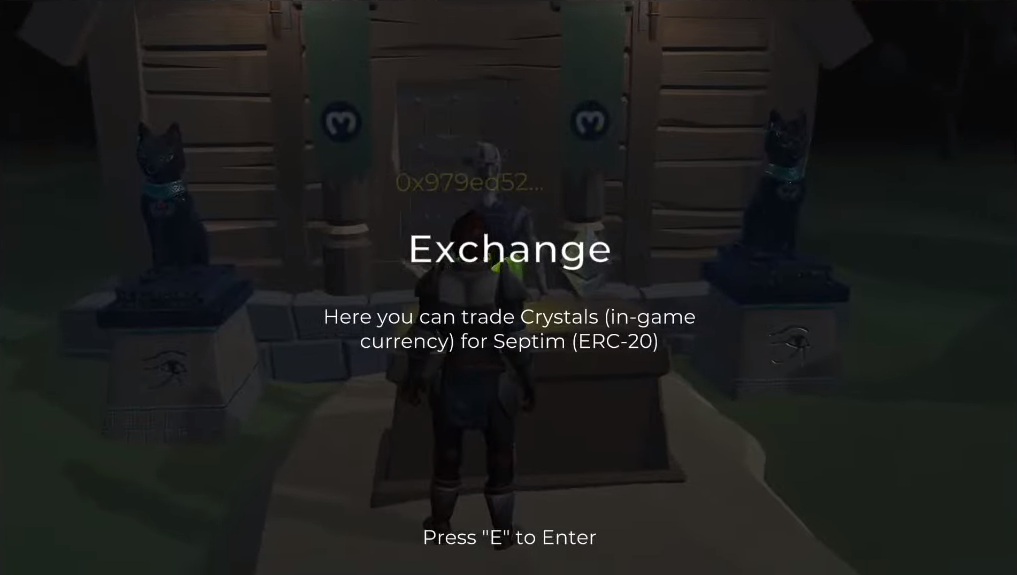
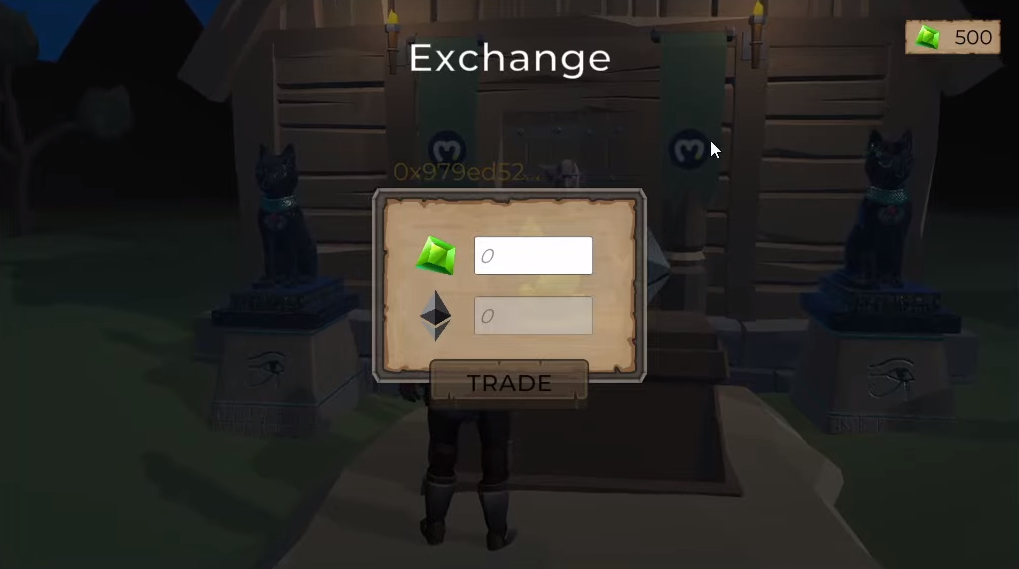
As you’ll be able to see, the sport tells gamers that they’ll use the trade counter to commerce their in-game forex (the forex in our recreation known as “crystals”) for “Septim” (coin title taken from Skyrim). The latter, in our case, is an ERC-20 token, which suggests it’s an on-chain asset and, due to this fact, there’s a sensible contract behind it (extra on that afterward). So, let’s say that one other scene of this recreation allows gamers to gather crystals by finishing some form of mission. Then, with a adequate quantity of crystals, gamers can trade them for Septim. So, if gamers need to trade their in-game forex, they should press “E”, which opens the next display screen:
Exchanging Web2 Foreign money for ERC-20 Tokens
Wanting on the above screenshot, you’ll be able to see that gamers can see their crystals stability within the top-right nook. Furthermore, within the middle of the display screen, they’ll enter the variety of crystals they need to trade for Septim. By the way in which, one Septim is price 50 crystals:
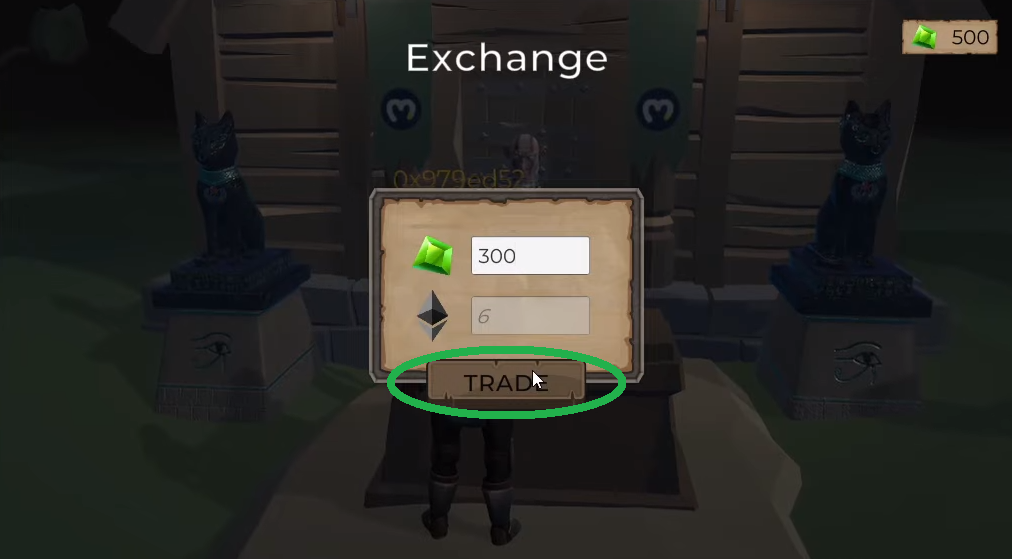
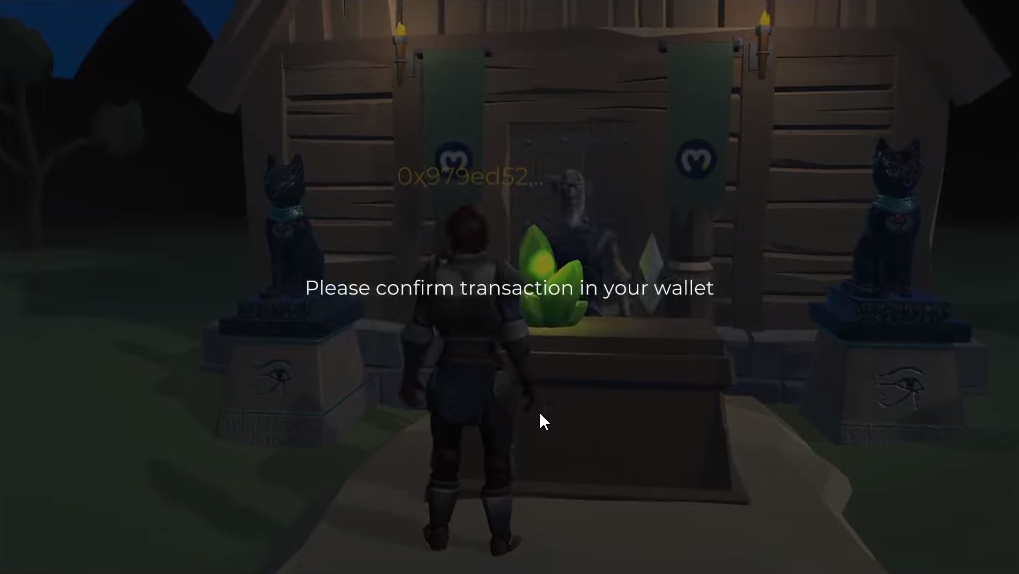
After the gamers click on on the “commerce” button, their crypto pockets will immediate them with a message to verify the “trade” transaction:
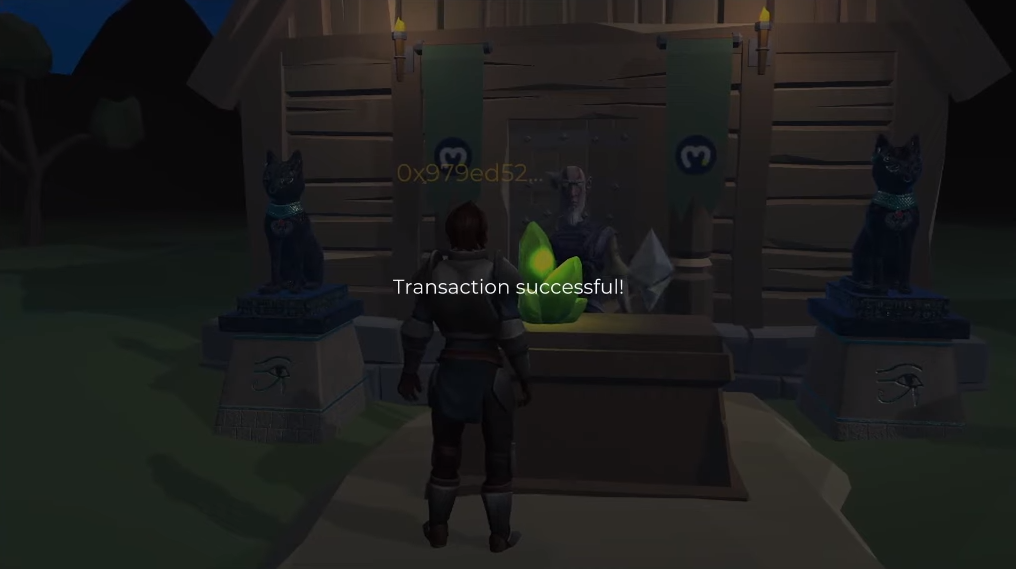
As soon as they affirm the transaction of their pockets, the sport informs them that the transaction was profitable:
Gamers can now step away from the trade counter and press “M” to entry the menu. There, they’ll see the up to date stability of their crystals and Septim:
The above on-chain transaction referred to as our sensible contract and minted six Septim tokens to the participant’s pockets handle. With a adequate Septim stability, the participant can use the store to purchase NFT outfits.
Purchase NFT Outfits with ERC-20 Tokens
Identical to the trade counter, gamers can see the next info as soon as they enter the outfit store’s collider:
Because the above message signifies, that is the place the place the participant can purchase NFT outfits with Septim. So, as soon as a participant press “E” on their keyboard, the participant can enter the outfit store:
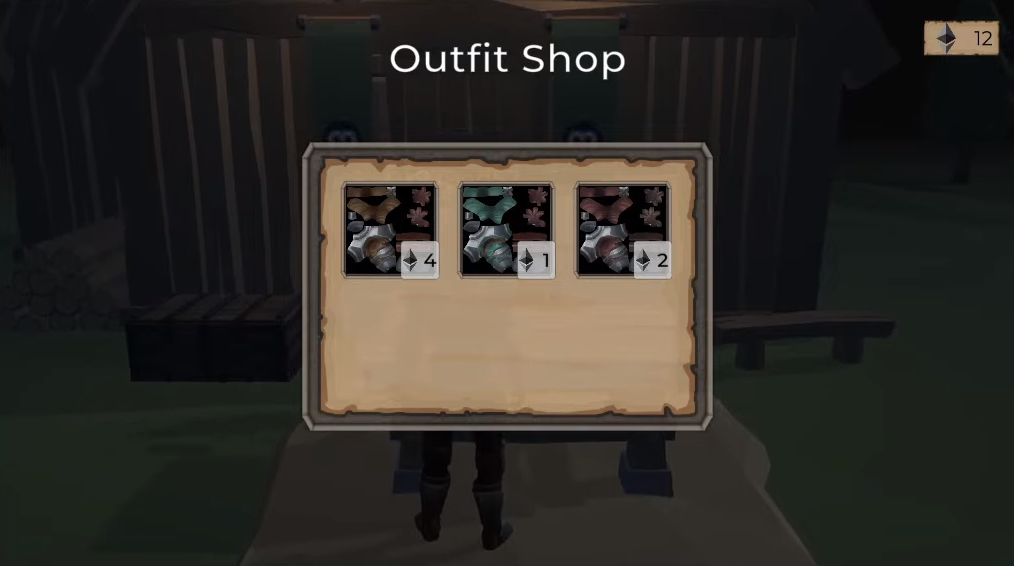
The outfit store shows three outfits, together with their costs in Septim. The participant can click on on the outfit that they need to purchase, which once more triggers the participant’s Web3 pockets:
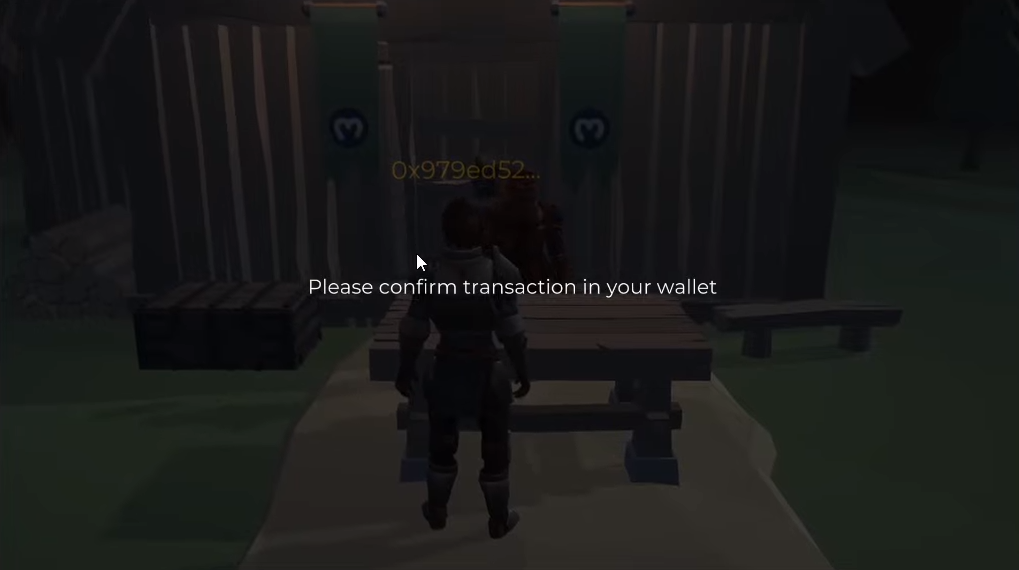
After confirming the transaction, the participant receives that NFT outfit into their pockets. Furthermore, the participant’s Septim stability will replace. Because of this the “purchase NFT outfits” transaction triggered each of our sensible contracts. Our ERC-721 sensible contract took care of minting an NFT outfit into the participant’s pockets. Our ERC-20 contract ensured {that a} adequate quantity of Septim tokens bought burned.
If the gamers now step away from the outfit store and press “M”, they see their new outfit contained in the “NFT Outfits” panel:
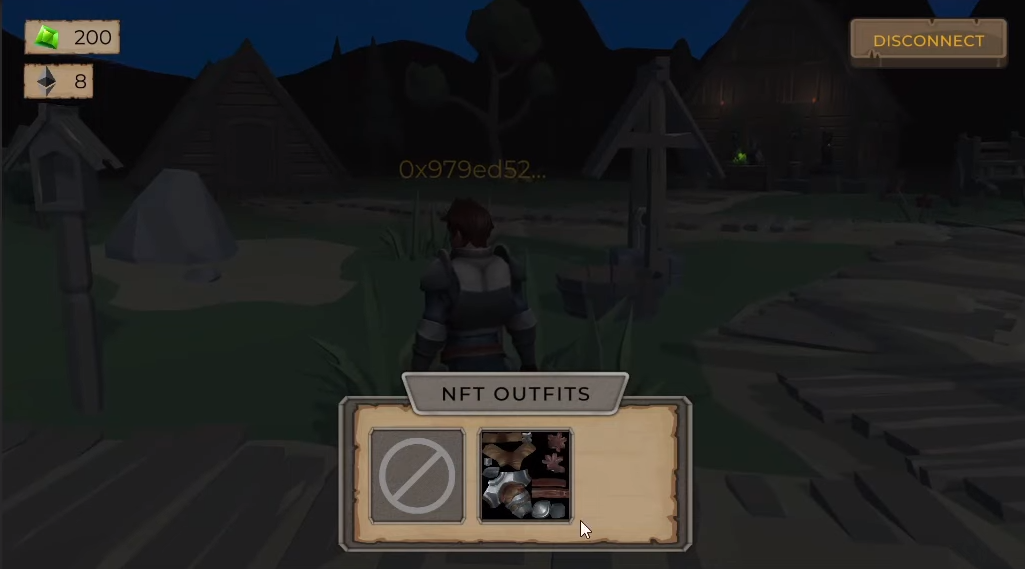
If the participant needs to put on the brand new NFT outfit, the participant solely must click on on it.
That’s it for the demo of our instance recreation that allows gamers to purchase NFT outfits. As you’ll be able to see, there are fairly many elements to such a characteristic. Nevertheless, through the use of the appropriate instruments, you’ll be able to implement such ERC-20 token and NFT use instances relatively effortlessly.
Implementing the “Purchase NFT Outfits In-Sport” Function
You need to use completely different recreation engines to create a Web3 recreation that lets gamers purchase NFT outfits. Nevertheless, it’s essential to use Unity to create your individual occasion of our above-presented recreation. Furthermore, because of Moralis’ Unity SDK, you’ll be able to cowl all kinds of Web3 performance simply by coming into your Moralis credentials. As such, we’ll present you ways to do this within the subsequent part!
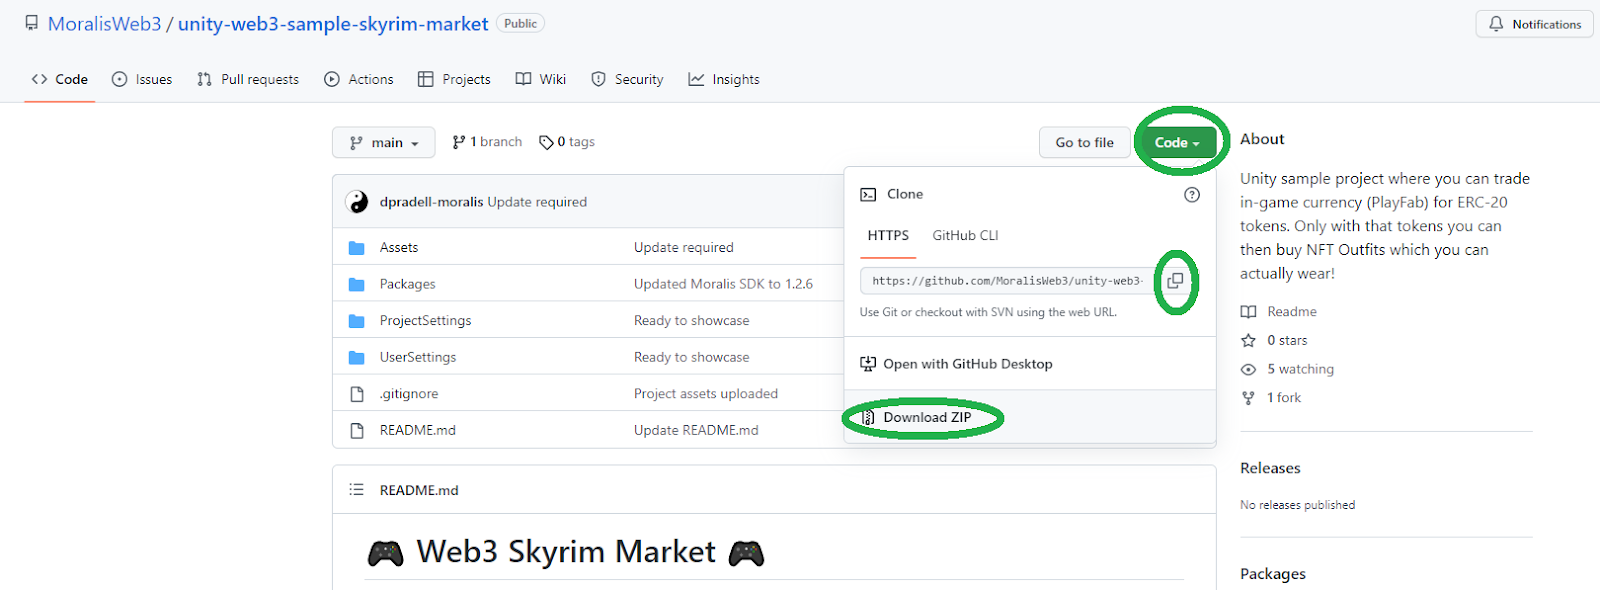
Along with Unity and Moralis, additionally, you will want your PlayFab account. The latter will allow you to handle in-game property simply. Nevertheless, one other important a part of the above-presented performance is correct sensible contracts. Thankfully, many neat instruments are at your disposal that allows you to deploy sensible contracts with out being a Solidity knowledgeable. On this tutorial, you’ll find out how to take action with Hardhat. Basically, you’ll simply must observe an in depth step-by-step information to tweak the mandatory default information. In fact, you’ll not must create sensible contracts your self. As an alternative, you’ll simply copy our code. So, begin by cloning our code or downloading the ZIP file that awaits you on GitHub:
Then, open the venture in Unity, the place the “Moralis Web3 Setup” window ought to open robotically:
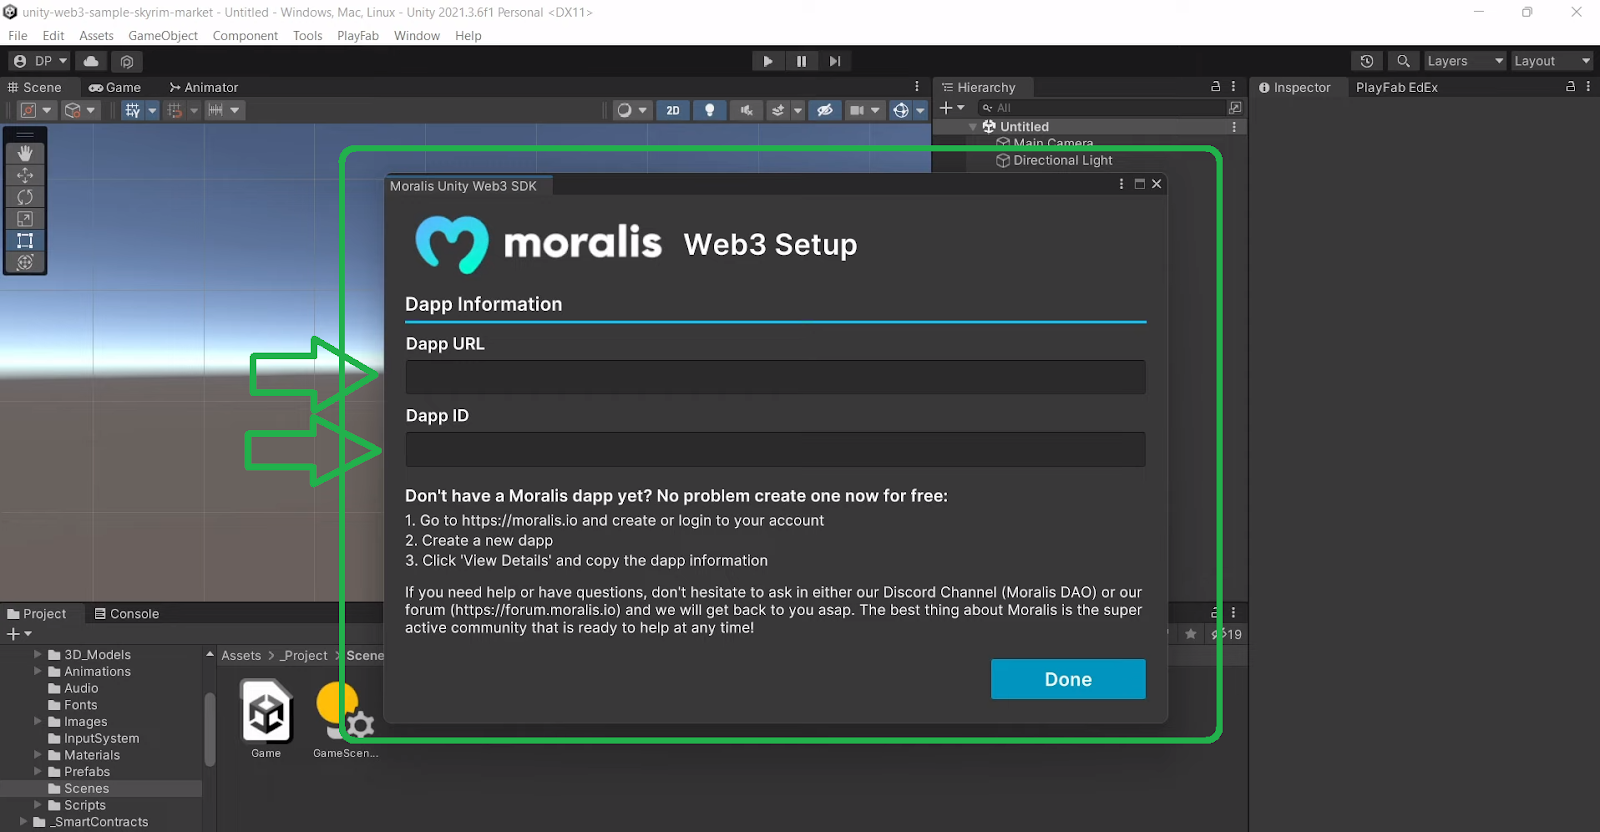
That is the place you’ll want to enter your Moralis dapp credentials. As such, that is the cue to care for the preliminary Moralis setup.
Activate the Moralis Unity SDK
These are the steps you’ll want to full to make use of Moralis’ Unity SDK:
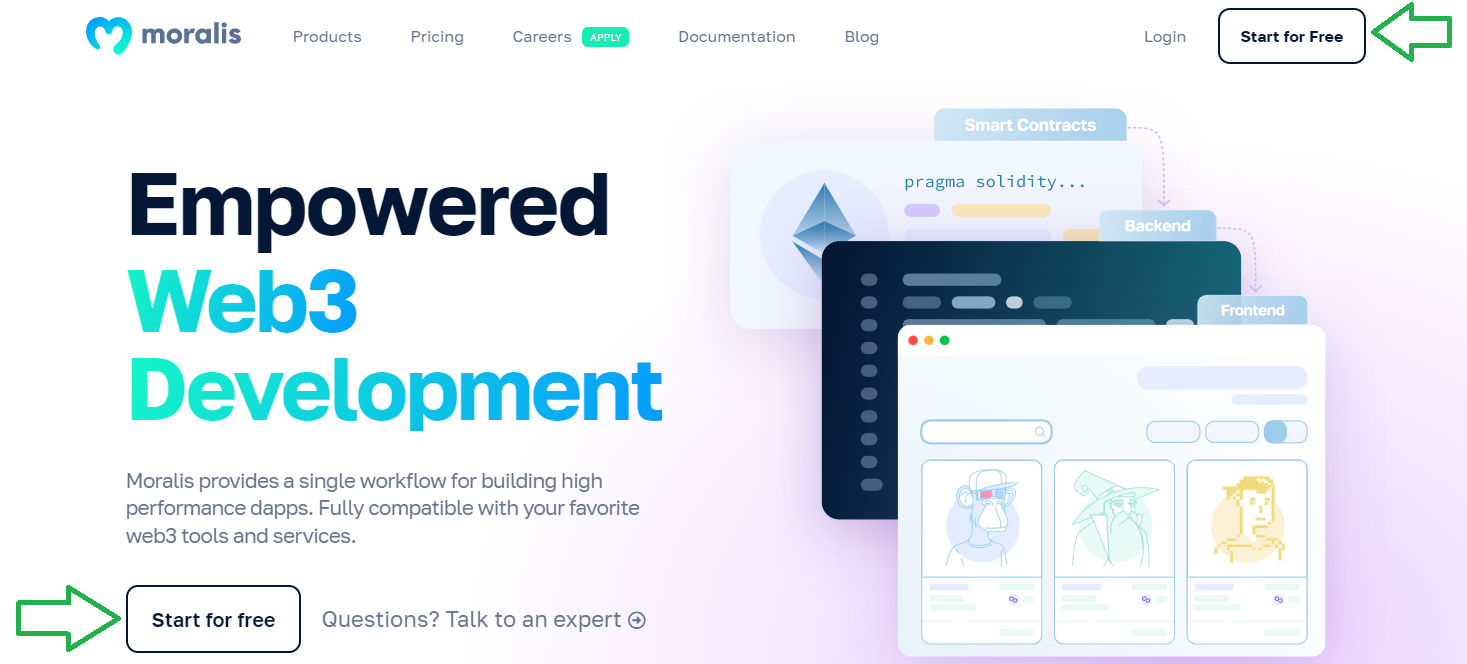
- Click on on “create your free Moralis account” talked about on the outset of this text or go to Moralis’ homepage and click on on “Begin for Free”:
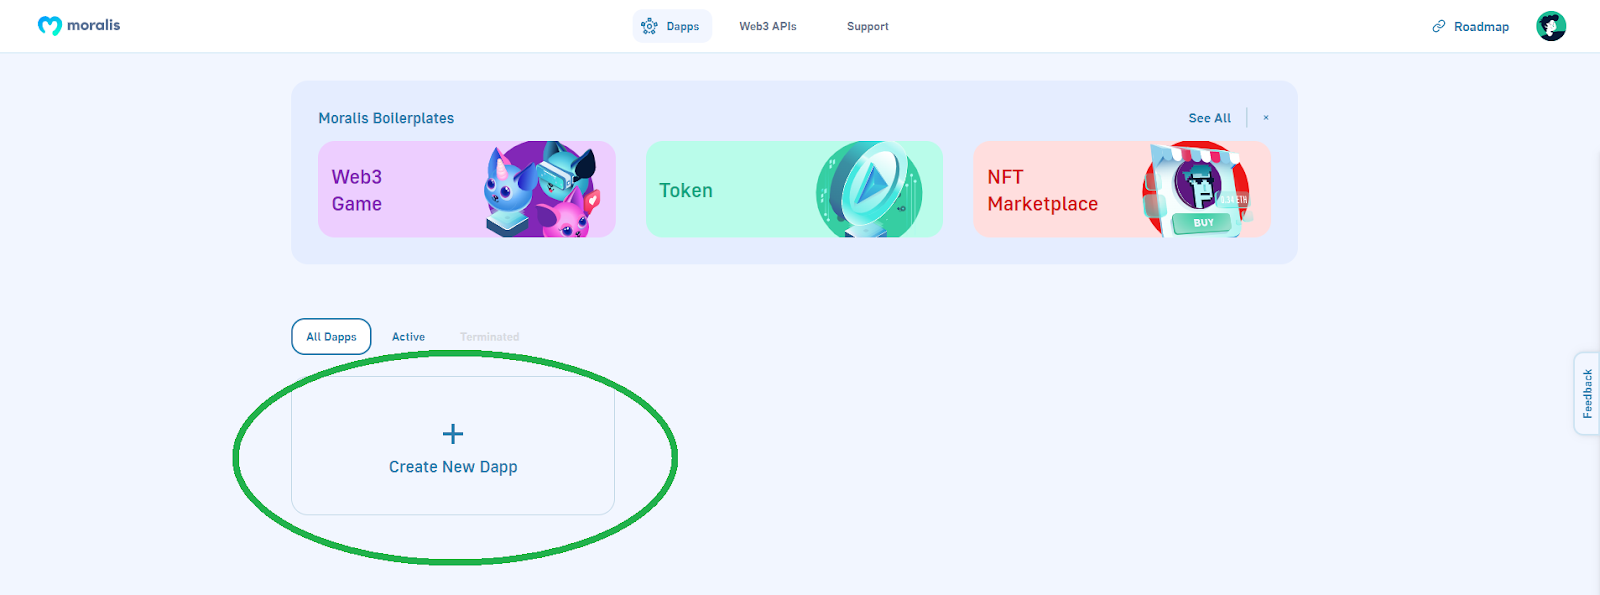
- After creating your account, it’s essential to enter your Moralis admin space. There, you’ll want to create a brand new dapp by clicking on the “Create New Dapp” button:
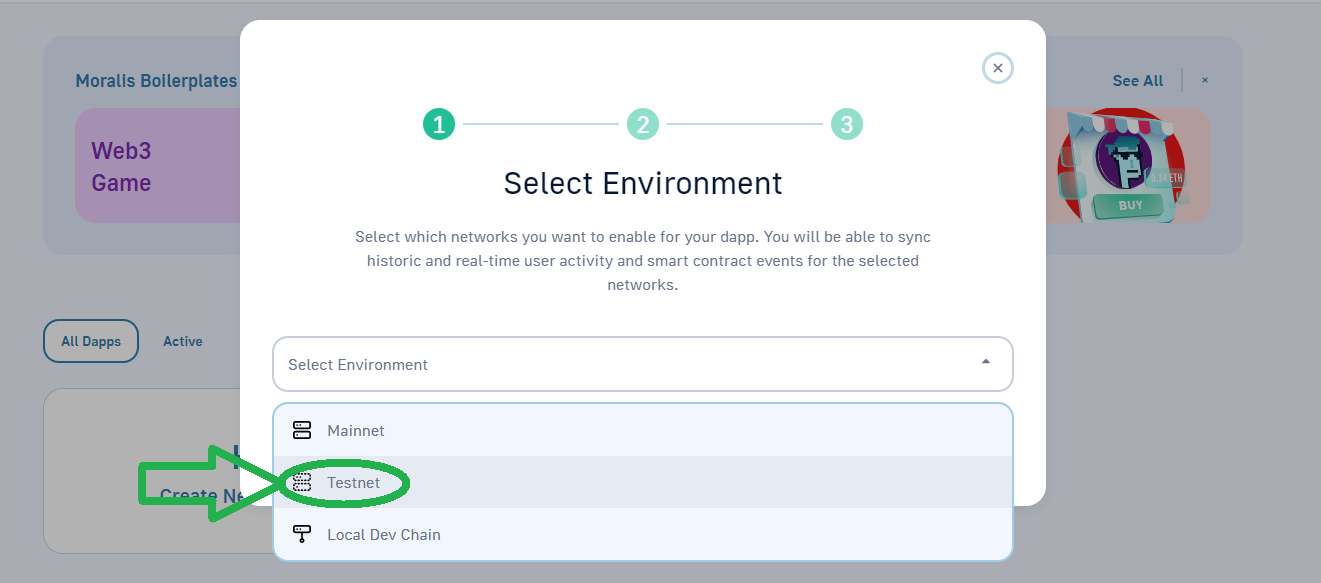
- The above button will provoke the dapp setup. First, you’ll want to pick your setting. Since that is an instance venture, go along with the “Testnet” possibility:
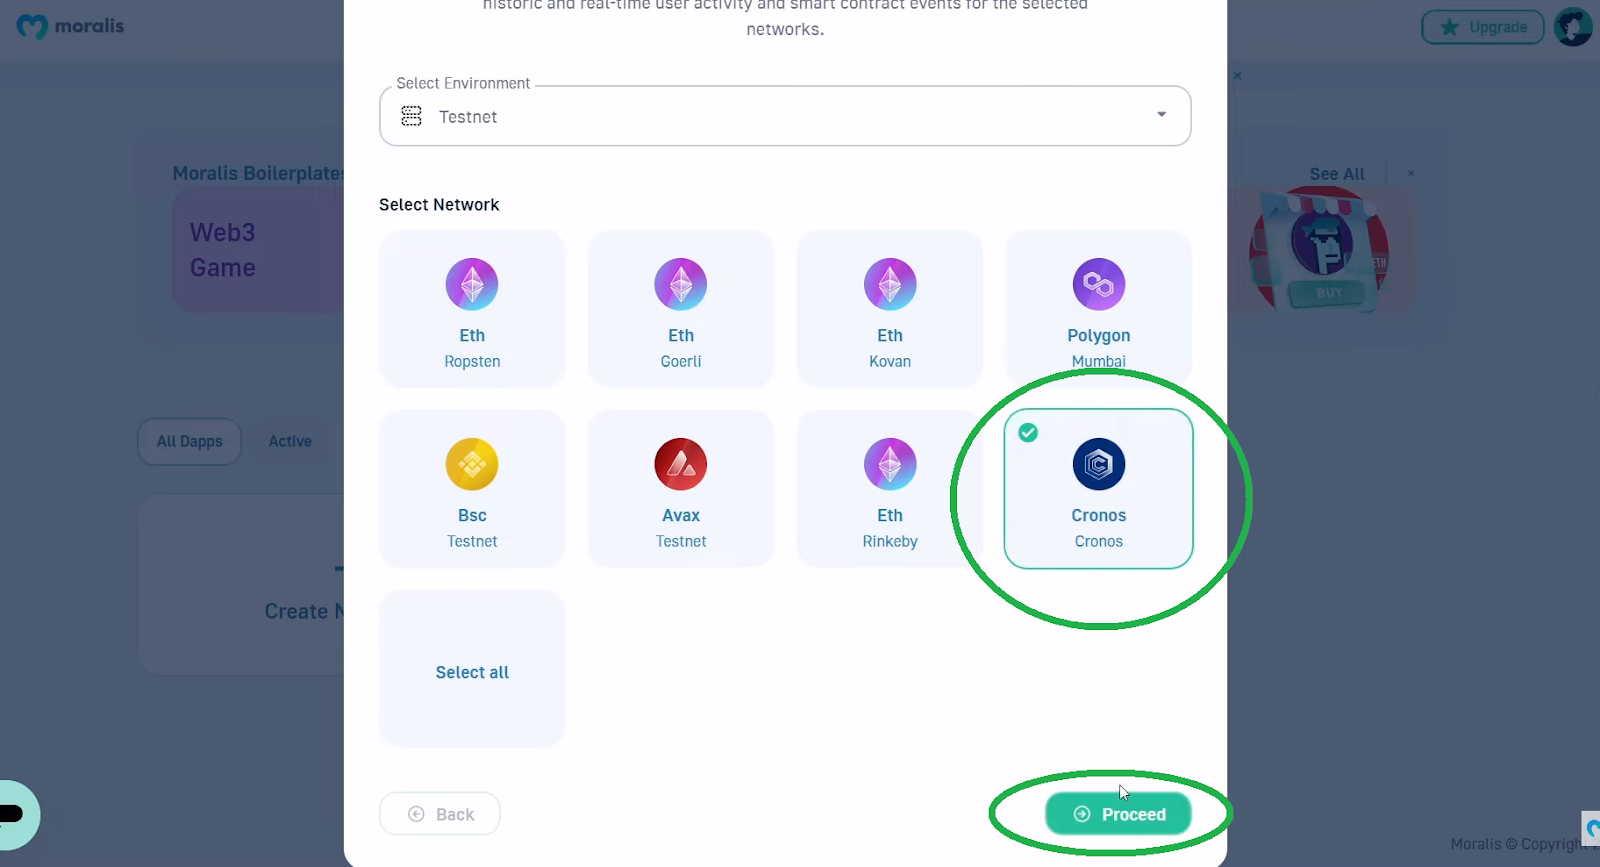
- Then, choose the chain you need to concentrate on. You’ll be able to choose a number of chains; nevertheless, for the sake of this tutorial, we’ll concentrate on Cronos. After deciding on the community of your selection, transfer on by clicking on “Proceed”:
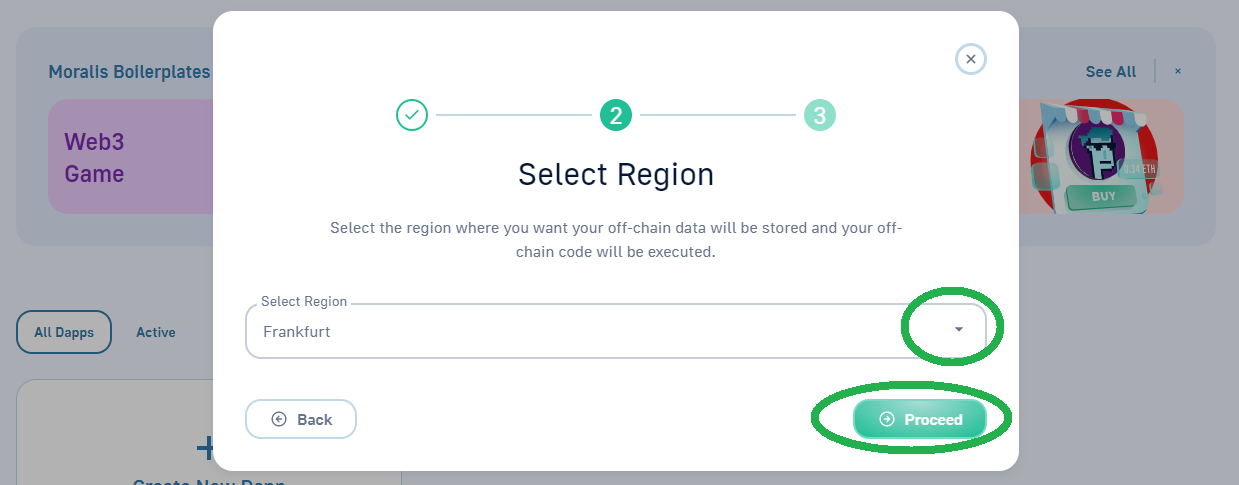
- Subsequent, choose your area. Merely use the drop-down menu and choose a metropolis that’s closest to your precise location:
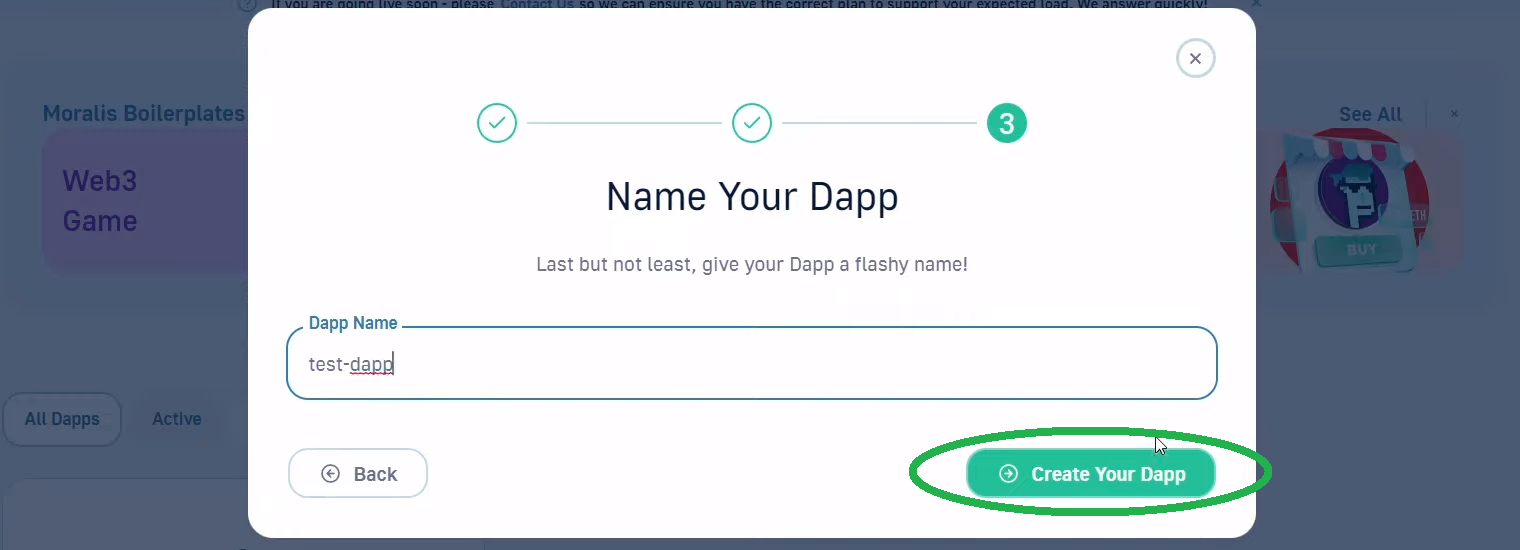
- Within the third step of your dapp setup, you’ll want to title your dapp. Thankfully, this may be something you need, so don’t overthink it. You’ll be able to observe our lead and go along with “test-dapp”. Then, spin up your dapp by clicking on the “Create Your Dapp” button:
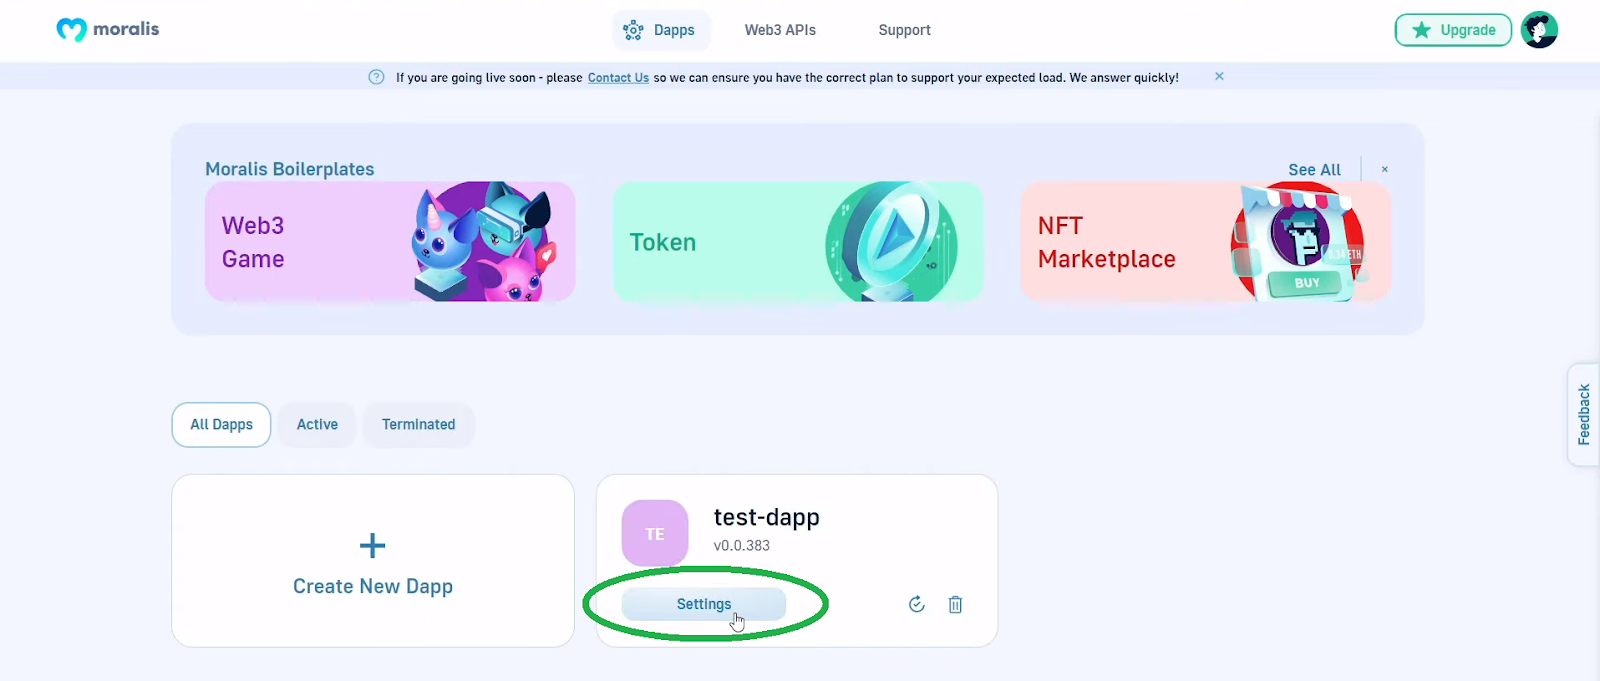
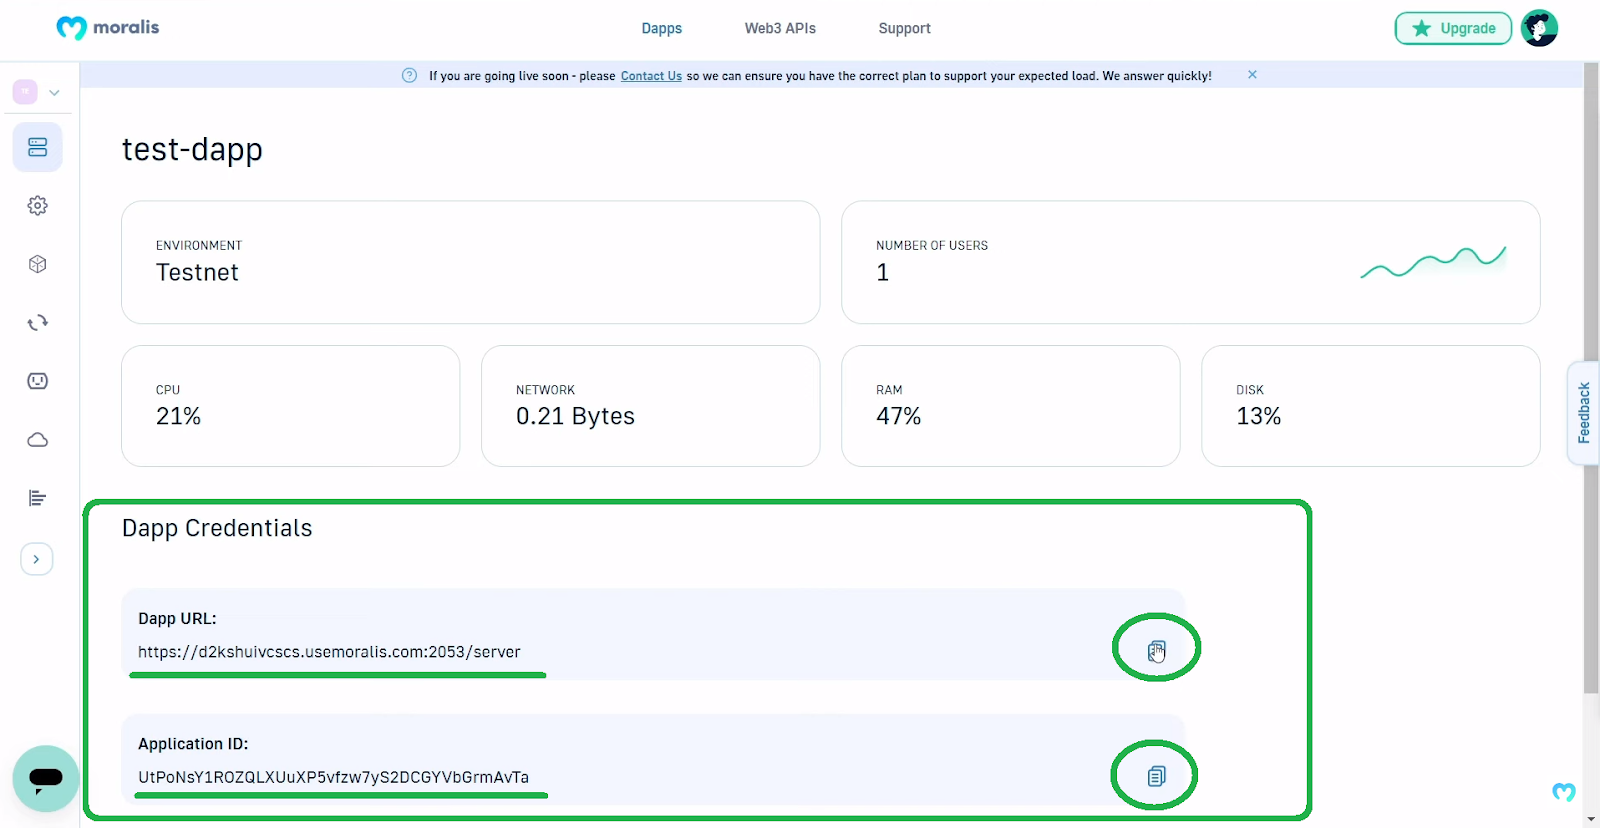
- It normally takes a few seconds earlier than your dapp is up and operating. Then, you’ll be able to view its credentials (URL and ID) through the “Settings” button:
- To repeat your dapp URL and ID, use the “copy” icons:
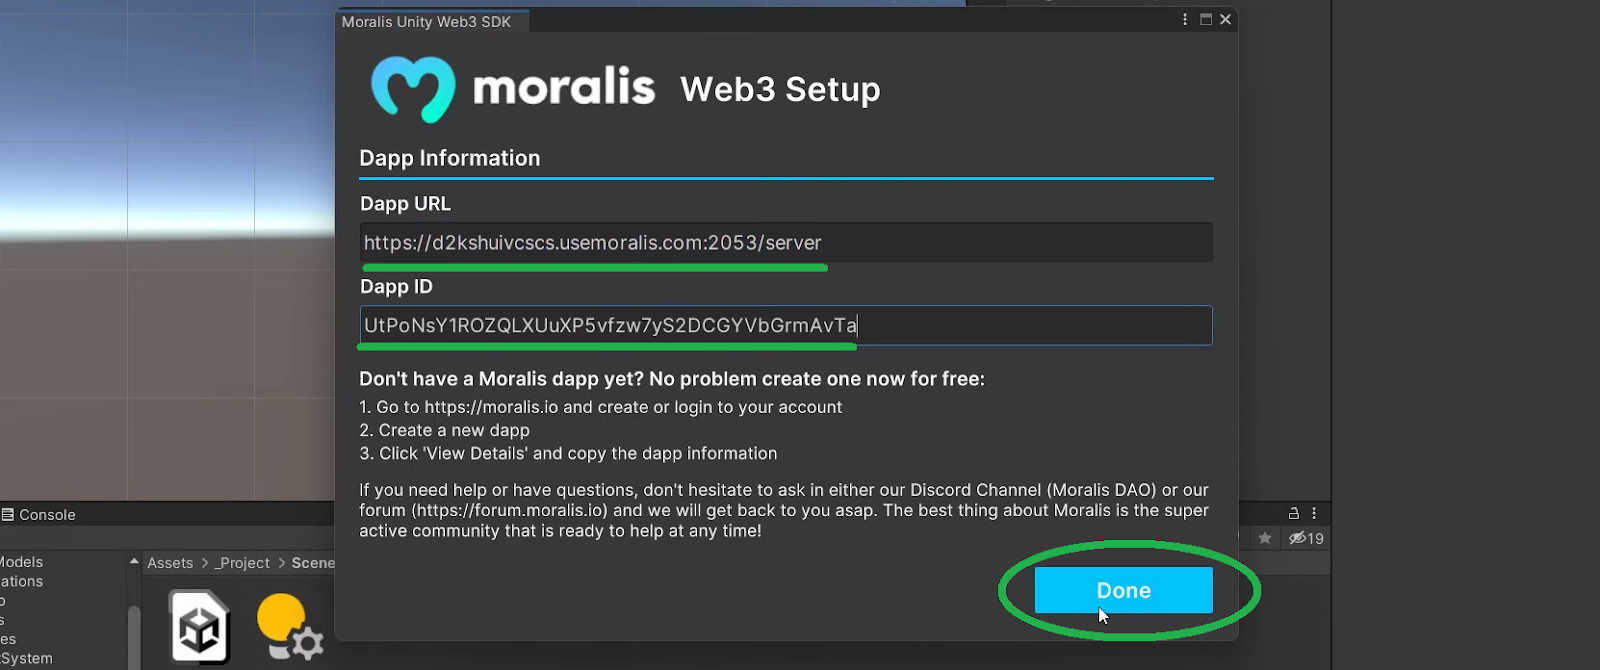
- Lastly, return to Unity and paste the above-copied credential into the designated entry fields. With the credentials in place, full the setup by clicking on “Performed”:
PlayFab Setup
As talked about above, we’ll use PlayFab to handle our in-game property, which is among the keys to providing the “purchase NFT outfits” possibility. As such, go to PlayFab’s homepage and create your account or log in to your current one:
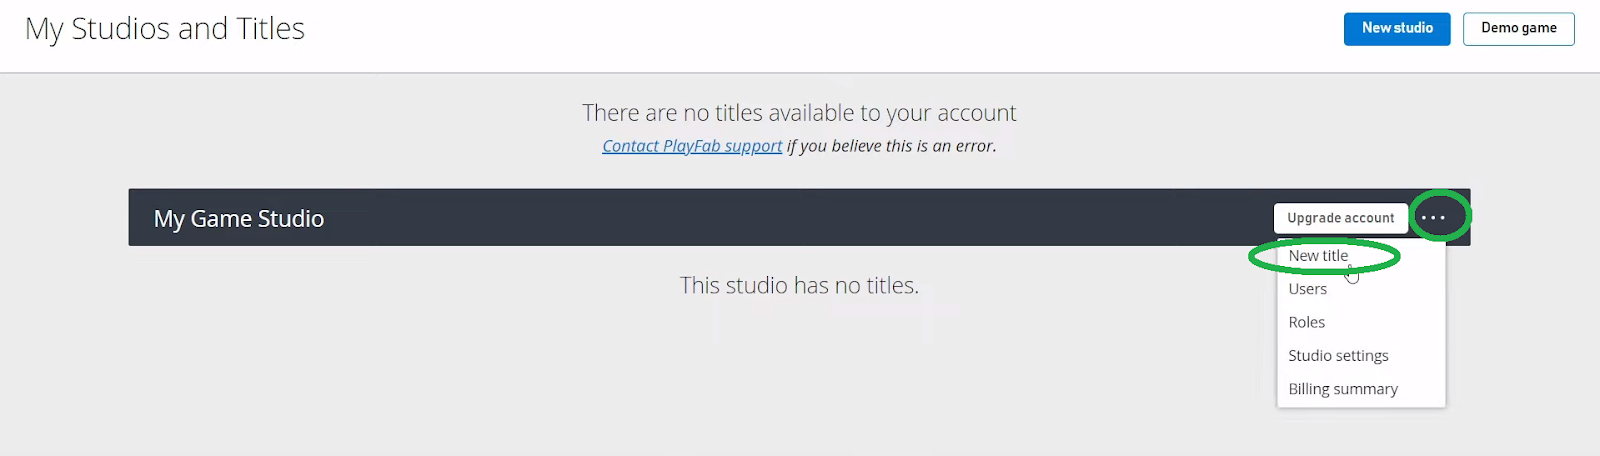
First, create a brand new studio. You’ll be able to observe our lead and title it “My Sport Studio”:

Subsequent, click on on the three dots within the “My Sport Studio” menu and choose “New title”:
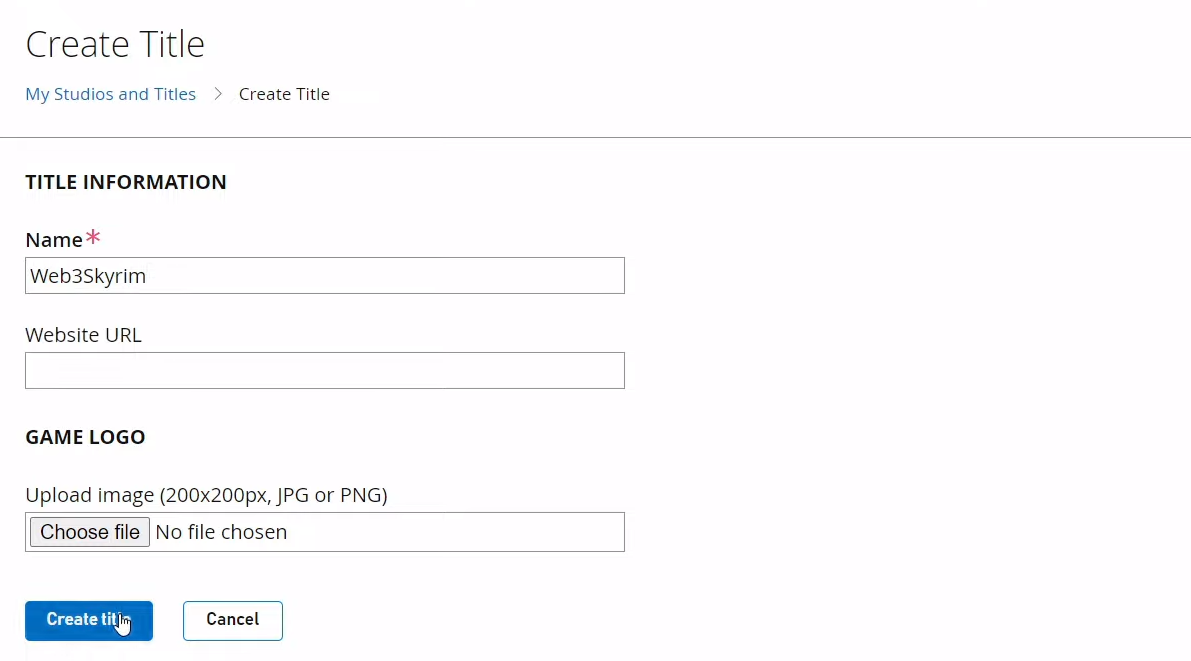
Then, enter the title and click on on the “Create title” button:
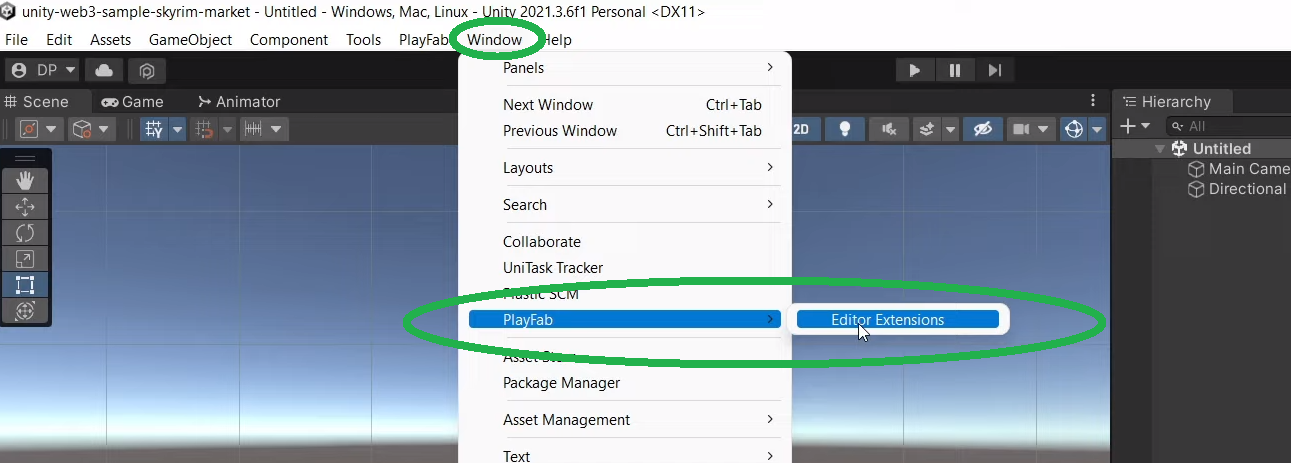
Shifting ahead, you’ll want to return to Unity and go to “Window” > “Playfab” and open “Editor Extensions”:
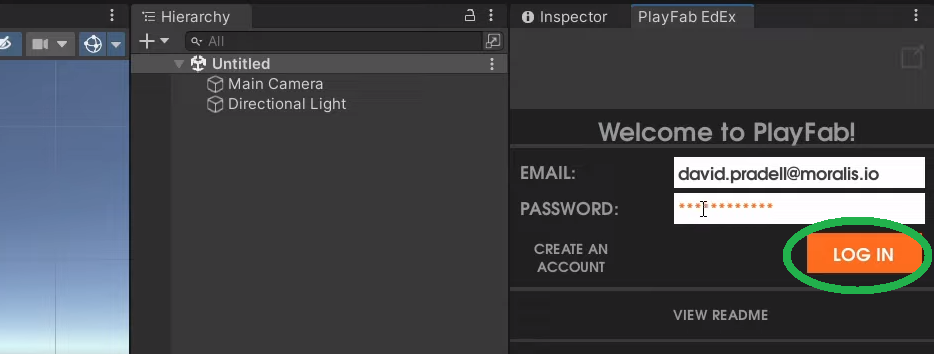
Subsequent, click on on “login”:

Then, enter your PlayFab credentials:
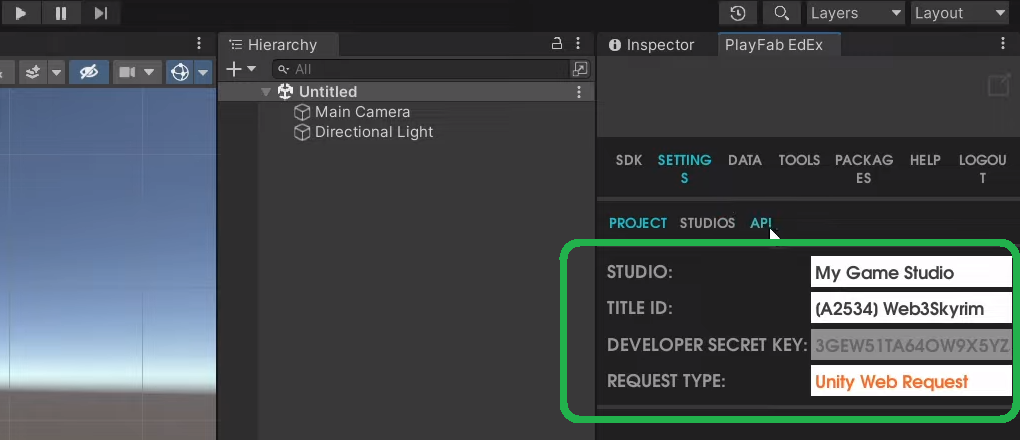
As soon as logged in, go to the “settings” tab and choose your studio:
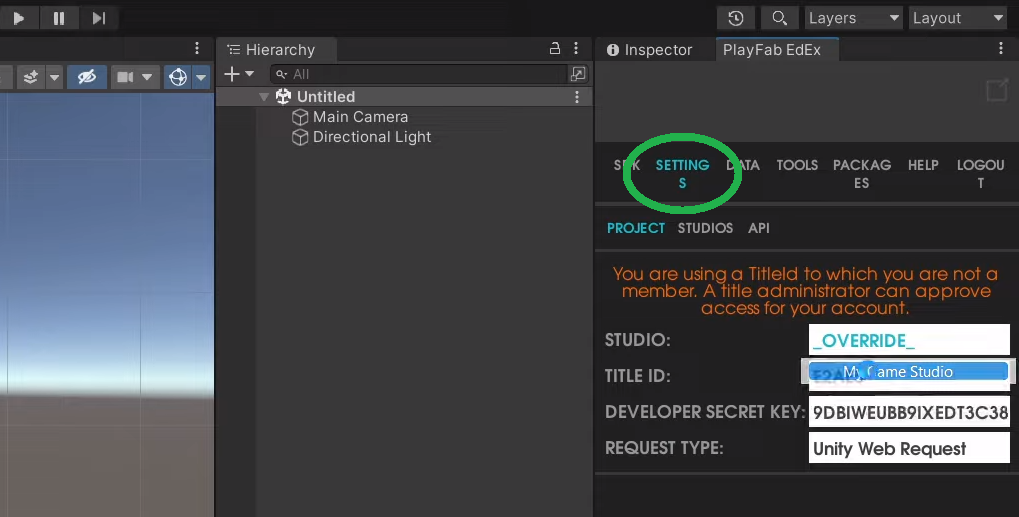
Furthermore, guarantee that the title ID matches the one you created above. Additionally, ensure that to pick “Unity Net Request” subsequent to “request kind”:
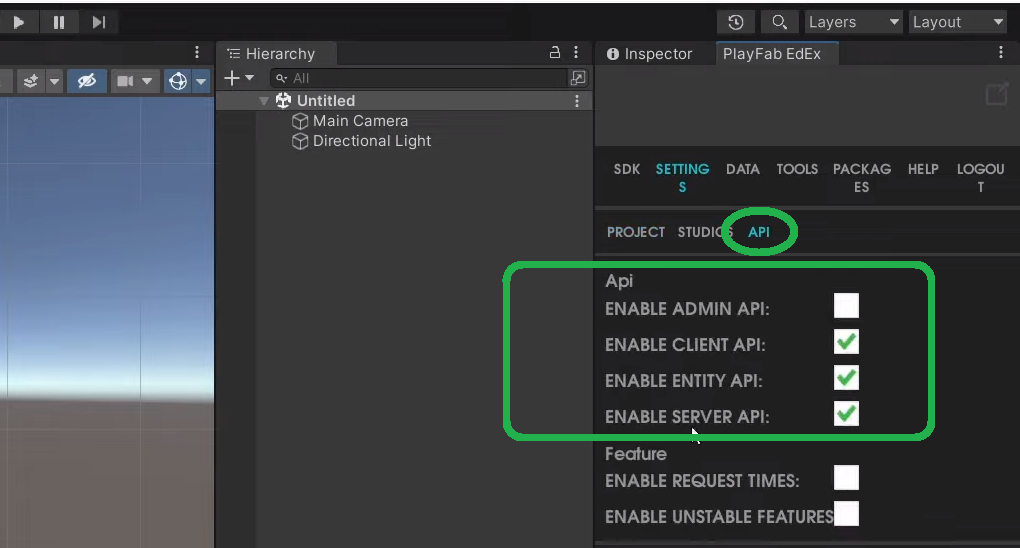
As well as, click on on the “API” tab and just be sure you have all the next APIs enabled:
After finishing the above setup, PlayFab is ready to get hold of all of the customers’ information, together with their Web3 pockets addresses. To see the way it accomplishes that, watch the video tutorial on the backside of this text, beginning at 8:53.
Good Contracts to Purchase NFT Outfits
As talked about earlier, sensible contracts are important when implementing the “purchase NFT outfits” characteristic. Thankfully, platforms akin to OpenZeppelin present verified sensible contracts that we are able to use. Nevertheless, for this instance, you need to use our sensible contracts. Furthermore, that is the place you’ll study to make use of Hardhat through Visible Studio Code (VSC). For detailed directions, use the video under, beginning at 10:59. That is additionally the place you’ll study the place in Unity you’ll want to enter your sensible contracts’ particulars:
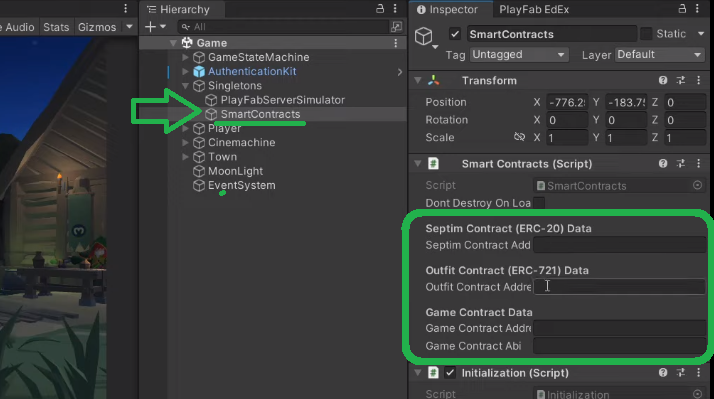
To make use of Hardhat effectively, use the “Directions.txt” file. Additionally, ensure that to repeat and delete the proper information (15:14). Beginning at 16:07, you’ll get to have a look at the sensible contracts in additional element. That is the place you’ll additionally study that along with the 2 contracts accountable for minting our in-game tokens, additionally, you will deploy a 3rd contract. The latter will be sure that your recreation correctly communicates with the opposite two contracts.
After efficiently deploying our sensible contracts, you’ll take a more in-depth take a look at the scripts behind our recreation (24:18). Our in-house knowledgeable will present you the way to full the mandatory settings in your PlayFab dashboard. So, use the video under to correctly implement the “purchase NFT outfits” characteristic!
Methods to Purchase NFT Outfits In-Sport – Abstract
We coated fairly a distance on this article. In any case, enabling gamers to purchase NFT outfits is sort of a complicated characteristic. Nevertheless, for those who adopted our lead, you found the way to use Moralis and PlayFab to do this fairly effortlessly. In the end, you needed to full the next 5 levels:
- Preliminary Moralis (Web3) and PlayFab setup (Web2)
- Deploying sensible contracts
- Implementing the “in-game-assets-to-ERC20-tokens” trade performance
- Establishing the NFT outfit store performance
- Making use of NFT outfits to the avatar
Should you loved this tutorial, we encourage you to go to the Moralis YouTube channel and the Moralis weblog. There you’ll find a ton of different Unity Web3 instance initiatives. These are additionally the locations to discover different Web3 growth elements. Basically, you need to use these two shops to develop into a Web3 developer without cost!
Nevertheless, if you wish to land a crypto job sooner relatively than later, turning into blockchain licensed can assist enormously. As such, it’s possible you’ll need to think about enrolling in Moralis Academy. Except for top-tier blockchain growth programs, that is the place to get a personalised examine path and knowledgeable mentorship. That is additionally the place you’ll be able to be part of one of the advancing communities within the business!


