
This text will dive deeper into Web3 authentication and, extra particularly, find out how to add Coinbase Pockets login performance. In doing so, we are going to create a easy authentication software permitting customers to log in, signal a message, and consider consumer info. If you want to skip the tutorial and leap straight into the code, you may go to the next GitHub repository:
Full Authentication Software Documentation – https://github.com/MoralisWeb3/demo-apps/tree/predominant/nextjs_moralis_auth
Should you look nearer on the GitHub repo, you’ll shortly discover that it’s associated to MetaMask. Thus, you have to regulate the code and add Coinbase Pockets because the supplier. Should you need assistance with this, observe alongside as we discover find out how to simply add Coinbase Pockets login performance.
A unified identification layer is a superb characteristic of Web3 because it permits customers to work together with decentralized purposes and different thrilling Web3 initiatives by their Web3 wallets. As such, to create a compelling consumer expertise, permitting customers to authenticate their Web3 id when utilizing your purposes is important. A distinguished instance of that is Coinbase Pockets, which is the place we’re going to direct our consideration on this article. Extra particularly, we are going to illustrate find out how to add Coinbase Pockets login performance to all apps utilizing Moralis!
Web3 authentication is simply one of many areas wherein Moralis shines. Additionally, you will extremely profit from Moralis if you happen to try to turn out to be a blockchain developer. For that reason, make sure that to create an account with Moralis instantly. Doing so solely takes a couple of seconds, and you will get began solely free! Moreover, if you wish to create dapps, you may moreover use Moralis to simply implement Web3 syncs and Web3 webhooks. Furthermore, these are just a few instruments and options that assist bridge the hole between Web2 and Web3 in an accessible manner!
What’s Coinbase Pockets?
Earlier than exhibiting you find out how to add Coinbase Pockets login performance to your dapps, we have to discover Coinbase Pockets. Therefore, we are going to take this preliminary part to discover the intricacies of Coinbase Pockets. So, with out additional ado, let’s reply the query, ”what’s Coinbase Pockets?”.
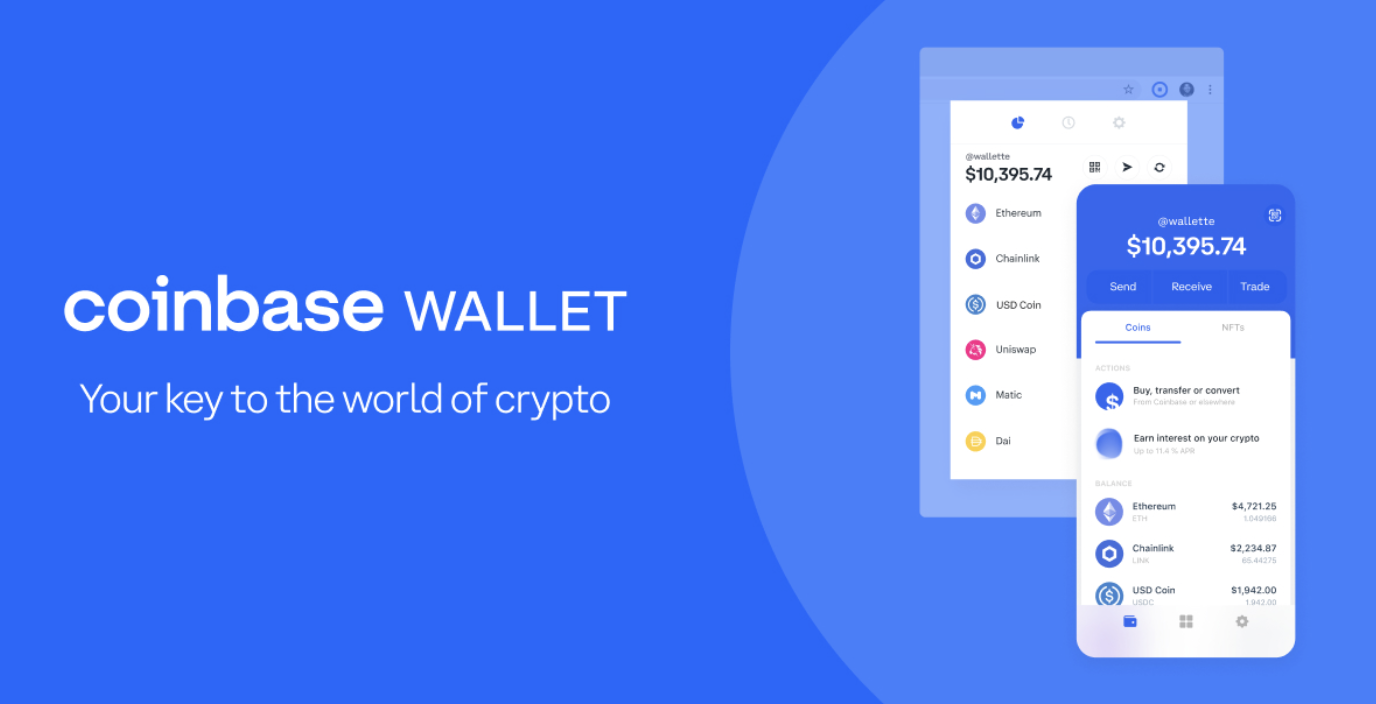
Coinbase Pockets is a multi-asset cryptocurrency pockets. Moreover, the pockets supplies a non-custodial service complementing Coinbase, a centralized cryptocurrency alternate. Additionally, Coinbase Pockets is likely one of the most important Web3 wallets in the marketplace, supporting a whole bunch of 1000’s of tokens and acts as a gateway to a whole ecosystem of dapps. Moreover permitting you to retailer belongings, Coinbase Pockets affords many extra options. Additional, this consists of an all-in-one place to promote, purchase, and commerce cryptocurrencies and NFTs. Furthermore, because the pockets is a gateway to the Web3 realm, customers have the potential to take part in play-to-earn gaming apps, vote on DAO occasions, earn APY on belongings, and many others., all by Coinbase Pockets.
As Coinbase Pockets supplies a whole self-custody service, customers are in full management and have limitless entry to all their belongings always. Moreover, Coinbase Pockets supplies an intuitive consumer interface (UI) to deal with belongings and work together with Web3 dapps and providers. As such, this pockets is a useful onboarding instrument for newcomers to the trade.
Coinbase Pockets is appropriate with Ethereum and several other different EVM-compatible chains similar to BNB Chain, Polygon, Avalanche, and many others. Furthermore, you’ve the potential to work together with one Coinbase Pockets account over a number of gadgets. Additionally, you may both obtain and work together with the pockets as a browser extension or a cell dapp on each iOS and Android smartphones.
With a greater understanding of Coinbase Pockets, we are able to proceed for instance how one can add Coinbase Pockets login performance with Moralis!
Methods to Add Coinbase Pockets Login Performance with Moralis
On this tutorial, we are going to intently look at how Moralis’ Web3 authentication works. To exhibit how straightforward it’s so as to add Coinbase Pockets login performance with Moralis’ Auth API, we’re going to add safe authentication to a Subsequent.js software. As we achieve this, we are going to stroll you thru making a full-stack Web3 authentication app with the distinguished Subsequent.js framework.
The appliance we need to create will enable customers to log in utilizing Coinbase Pockets. Following the pockets authentication course of, the next-auth library is accountable for making a session cookie containing an encrypted JWT (JWE). That may embody session data similar to addresses, expiration occasions, and signed messages within the customers’ browsers. Moreover, it is a legitimate manner of storing info concerning customers with no database. Furthermore, it’s unimaginable to entry or alter this information within the JWT with no key. As soon as a consumer authenticates themselves, they’ll obtain entry to a web page that shows their consumer info.
For example what we’re working in the direction of, we are going to provide screenshots herein showcasing the totally different pages:
Login Web page:

Consumer Session Web page:

Nonetheless, earlier than we proceed with the tutorial, it is advisable to care for a couple of conditions. First, you will have a Moralis account. Making a Moralis account solely requires a few clicks and is solely free. With an account at hand, it is advisable to set up an IDE or built-in improvement setting. On this occasion, we are going to use Visible Studio Code (VSC). Lastly, you additionally want a Subsequent.js software. Furthermore, if you’d like extra assist with this, you may create the applying utilizing “create-next-app” or take a better take a look at the Subsequent.js dapp tutorial!
With all conditions finalized, we are able to take a better take a look at how one can add Coinbase Pockets login performance to your software.
Add Coinbase Pockets Login Performance – Dependencies, Libraries, and Environmental Variables
In case you have not already, the very first thing you will have to do is to put in a couple of dependencies. So, you may go forward and set up Moralis, next-auth, and axios. You’ll be able to obtain this by the next command:
npm set up moralis next-auth axiosSo as to add Coinbase Pockets login performance, you have to additionally use a Web3 library. For this quick tutorial, we are going to use Wagmi. As such, you will have to put in a Wagmi dependency, which could be achieved by the next snippet:
npm set up wagmi ethersMoreover, each of the earlier instructions are put in utilizing npm; nonetheless, you’ve extra choices right here. For instance, you need to use each yarn and pnpm as nicely. For extra info on this, please take a look at the documentation on find out how to check in with MetaMask.
Lastly, you additionally want so as to add environmental variables to your ”.env.native” file within the software root:
APP_DOMAIN=wonderful.finance
MORALIS_API_KEY=xxxx
NEXTAUTH_URL=http://localhost:3000
NEXTAUTH_SECRET=7197b3e8dbee5ea6274cab37245eec212
The ”NEXTAUTH_URL” variable within the snipper is about to ”http://localhost:3000”. This must be equal to your app handle; nonetheless, you may go away it as is throughout the improvement levels.
What’s extra, the ”NEXTAUTH_SECRET” variable could be set to any worth and is used for encrypting JWT tokens of the customers. If you want, you may generate a worth utilizing the next hyperlink:
https://generate-secret.now.sh/32
Wrapping the App with SessionProvider/WagmiConfig and Request Message Endpoint
Now, it is advisable to create a brand new “pages/_app.jsx” file. Following this, you have to additionally wrap your pages with “SessionProvider” and “WagmiConfig“. After doing so, it ought to appear like this in your software:
import { createClient, configureChains, defaultChains, WagmiConfig } from 'wagmi';
import { publicProvider } from 'wagmi/suppliers/public';
import { SessionProvider } from 'next-auth/react';

const { supplier, webSocketProvider } = configureChains(defaultChains, [publicProvider()]);

const consumer = createClient({
  supplier,
  webSocketProvider,
  autoConnect: true,
});

perform MyApp({ Part, pageProps }) {
  return (
    <WagmiConfig consumer={consumer}>
      <SessionProvider session={pageProps.session} refetchInterval={0}>
        <Part {...pageProps} />
      </SessionProvider>
    </WagmiConfig>
  );
}

export default MyApp;
After you have finalized wrapping the app with “SessionProvider” and “WagmiConfig“, you may proceed with creating a brand new API file, “pages/api/auth/request-message.js”. You then make the most of this endpoint to ship requests to “Moralis.Auth“. This can generate distinctive messages that are later signed on the client-side. Furthermore, that is what it ought to appear like in your repository:
import Moralis from 'moralis';

const config = {
    area: course of.env.APP_DOMAIN,
    assertion: 'Please signal this message to verify your id.',
    uri: course of.env.NEXTAUTH_URL,
    timeout: 60,
};

export default async perform handler(req, res) {
    const { handle, chain, community } = req.physique;

    await Moralis.begin({ apiKey: course of.env.MORALIS_API_KEY });

    attempt {
        const message = await Moralis.Auth.requestMessage({
            handle,
            chain,
            community,
            ...config,
        });

        res.standing(200).json(message);
    } catch (error) {
        res.standing(400).json({ error });
        console.error(error);
    }
}
Setting Up a Signal-In Web page and NextAuth Configuration
Now that we’ve seemed on the wrapping half, we are able to proceed with the following step. Accordingly, on this part, you’ll create a sign-in web page. So, you may proceed by creating a brand new web page file referred to as “signin.jsx”, and that is the whole code for the sign-in web page:
import { CoinbaseWalletConnector } from 'wagmi/connectors/coinbaseWallet'
import { signIn } from 'next-auth/react'
import { useAccount, useConnect, useSignMessage, useDisconnect } from 'wagmi'
import { useRouter } from 'subsequent/router'
import axios from 'axios'

perform SignIn() {
  const { connectAsync } = useConnect()
  const { disconnectAsync } = useDisconnect()
  const { isConnected } = useAccount()
  const { signMessageAsync } = useSignMessage()
  const { push } = useRouter()

  const handleAuth = async () => {
    if (isConnected) {
      await disconnectAsync()
    }

    const { account, chain } = await connectAsync({
      connector: new CoinbaseWalletConnector({
        choices: {
          appName: 'youramazing.finance',
        },
      }),
    })

    const userData = { handle: account, chain: chain.id, community: 'evm' }

    const { information } = await axios.put up('/api/auth/request-message', userData, {
      headers: {
        'content-type': 'software/json',
      },
    })

    const message = information.message

    const signature = await signMessageAsync({ message })

    // redirect consumer after success authentication to '/consumer' web page
    const { url } = await signIn('credentials', {
      message,
      signature,
      redirect: false,
      callbackUrl: '/consumer',
    })
    /**
     * as an alternative of utilizing signIn(..., redirect: "/consumer")
     * we get the url from callback and push it to the router to keep away from web page refreshing
     */
    push(url)
  }

  return (
    <div>
      <h3>Web3 Authentication</h3>
      <button onClick={() => handleAuth()}>Authenticate through Coinbase Pockets</button>
    </div>
  )
}

export default SignIn
Within the code above, we made positive to increase the “handleAuth” performance to name our “request-message” endpoint that we created within the earlier step. As well as, we made positive so as to add a “NextAuth” configuration, which we’re additionally about to create. Accordingly, you may create one other API file, “pages/api/auth/[…nextauth].js”. Furthermore, it ought to have the next content material:
import CredentialsProvider from 'next-auth/suppliers/credentials';
import NextAuth from 'next-auth';
import Moralis from 'moralis';

export default NextAuth({
    suppliers: [
        CredentialsProvider({
            name: 'MoralisAuth',
            credentials: {
                message: {
                    label: 'Message',
                    type: 'text',
                    placeholder: '0x0',
                },
                signature: {
                    label: 'Signature',
                    type: 'text',
                    placeholder: '0x0',
                },
            },
              async authorize(credentials) {
                try {
                  // "message" and "signature" are needed for authorisation
                  // we described them in "credentials" above
                  const { message, signature } = credentials;

                  await Moralis.start({ apiKey: process.env.MORALIS_API_KEY });

                  const { address, profileId } = (
                    await Moralis.Auth.verify({ message, signature, network: 'evm' })
                  ).raw;

                  const user = { address, profileId, signature };
                  // returning the user object and creating  a session
                  return user;
                } catch (e) {
                  console.error(e);
                  return null;
                }
              },
        }),
    ],
    // including consumer data to the consumer session object
    callbacks: {
        async jwt({ token, consumer }) {
            consumer && (token.consumer = consumer);
            return token;
        },
        async session({ session, token }) {
            session.consumer = token.consumer;
            return session;
        },
    },
});
Making a Consumer Web page
Lastly, this tutorial’s ultimate step is making a consumer web page. Therefore, we’re going to create a brand new web page referred to as ”customers.jsx”, and the file ought to appear like this:
import { getSession, signOut } from 'next-auth/react';

// will get a prop from getServerSideProps
perform Consumer({ consumer }) {
    return (
        <div>
            <h4>Consumer session:</h4>
            <pre>{JSON.stringify(consumer, null, 2)}</pre>
            <button onClick={() => signOut({ redirect: '/signin' })}>Signal out</button>
        </div>
    );
}

export async perform getServerSideProps(context) {
    const session = await getSession(context);

    // redirect if not authenticated
    if (!session) {
        return {
            redirect: {
                vacation spot: '/signin',
                everlasting: false,
            },
        };
    }

    return {
        props: { consumer: session.consumer },
    };
}

export default Consumer;
Now that’s it for this quick tutorial. At this level, you must know find out how to add Coinbase Pockets login performance to all of your future purposes. Nonetheless, we additionally want to make sure that the applying works as meant. Thus, within the following part, we’re going to look nearer at how one can take a look at this straightforward software.
Add Coinbase Pockets Login Performance – Testing the Software
The very last thing we should do is be sure that the applying works as meant. So, to check the applying, you may go forward and go to the “http://localhost:3000/signin” web page.
As soon as the applying begins, you may click on on the ”Authenticate with Coinbase Pockets” button on the web page:

This could immediate your Coinbase Pockets and ask you to attach. Accordingly, all it is advisable to do is press the ”Join” button:

Following this, it is advisable to signal the message. As quickly as you signal the message and efficiently authenticate, you ought to be redirected to the ”/consumer” web page, which is able to look one thing like this:
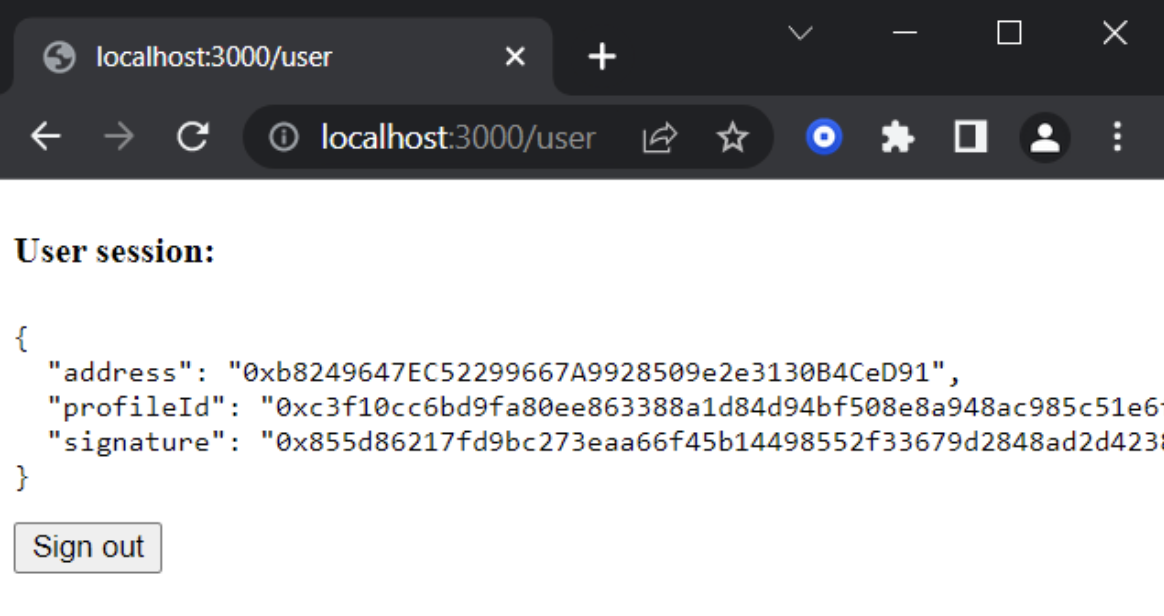
By wanting on the picture above, the consumer session consists of an handle, profile ID, and signature. What’s extra, there may be the choice to signal out. You can even go to “http://localhost:3000/consumer” immediately to make sure that there aren’t any bugs. Moreover, if a consumer is authenticated, it ought to show the consumer’s data; if not, this could direct us to the “/signin” web page as an alternative. Furthermore, if you happen to obtain these outcomes, the applying works because it ought to. Therefore, you’ve now efficiently added Coinbase Pockets login performance to your software. Consequently, now you can add Coinbase Pockets login performance to all future blockchain initiatives!
Should you encounter any difficulties or points, take a look at the whole GitHub repository and examine the code intimately. What’s extra, you may take a look at the official documentation for extra info on how one can check in with Coinbase Pockets. Furthermore, if you happen to would somewhat add the identical performance for different pockets alternate options, take a look at the official authentication docs. There, you’ll find additional info on including help for MetaMask, WalletConnect, RainbowKit, and many others.
Add Coinbase Pockets Login Performance – Abstract
Web3 authentication, which permits customers to check in and entry the prolonged ecosystem of dapps with their crypto wallets, is important inside the Web3 improvement area. Additional, as a vital mechanism, we determined to dedicate this text to exploring Web3 authentication. As such, we took the chance for instance how one can add Coinbase Pockets login performance to your purposes.
In doing so, we created a easy Subsequent.js software that enables customers to check in and authenticate themselves with their Web3 wallets. As soon as signed in, they might view info concerning themselves, similar to an handle, profile ID, and signature. Moreover, we had been in a position to implement this performance with ease, because of Moralis’ Auth API. Accordingly, if you happen to adopted alongside by this tutorial, you are actually hopefully able to including Coinbase Pockets login performance to all of your future blockchain initiatives.
Nonetheless, Moralis’ Auth API is just one of many Moralis APIs you may discover. As such, in case you are a Web3 developer, or need to turn out to be one, make sure that to additionally take a look at the NFT API and EVM API. These are instruments making each dapp and NFT improvement considerably extra accessible.
What’s extra, in case you are within the newest and most related blockchain content material, take a look at Moralis’ Web3 weblog. For instance, we suggest trying out our articles on blockchain syncs, NodeJS SDK for Web3, or find out how to pull information from Polygon blockchain.

Furthermore, if you wish to turn out to be more adept in Web3 improvement, make sure that to enroll in Moralis Academy. Moralis Academy affords an amazing collection of blockchain programs for each learners and extra skilled builders.
Nonetheless, if you wish to be taught extra about blockchain improvement and turn out to be a Web3 developer, enroll with Moralis. Creating an account is free, and you are able to do so in seconds!


