
One important function all decentralized purposes (dapps) embody is authentication. Accordingly, as a Web3 developer, understanding methods to combine backend Web3 authentication is essential! Furthermore, as Web2 customers expertise the drawbacks of conventional authentication strategies, it’s not shocking that Web3 pockets suppliers corresponding to MetaMask discover large progress in lively customers. However, for a lot of programmers, it has been fairly difficult to implement a function the place customers can join their most well-liked Web3 wallets and show their Web3 identification. Nonetheless, because of Moralis, that is now not the case! Apart from providing Web3 syncs and unimaginable Web3 APIs, Moralis allows builders to shortly combine backend Web3 authentication. What’s extra, Moralis permits you to implement Web3 options with single strains of code!
Transferring ahead, we are going to tackle an instance mission the place we are going to use Subsequent.js to create a easy dapp. In fact, we are going to use Moralis to implement backend Web3 authentication performance. So, alongside the best way, you’ll study all it is advisable learn about Subsequent.js and Moralis to get going. Nonetheless, earlier than we get our fingers soiled, we are going to cowl some fundamentals in regards to the instruments we are going to use herein. We may even check out a fast demo of our completed Subsequent.js dapp. That method, you’ll know what to anticipate from this tutorial and whether or not or not you wish to roll up your sleeves as we transfer ahead. If that’s the case, additionally, you will must create your free Moralis account to entry Moralis’ backend Web3 authentication performance.

Moralis’ Backend Web3 Authentication
So, what makes backend Web3 authentication performance from Moralis so distinctive? For one, it unifies Web3 wallets and Web2 accounts in your utility. Moreover, it allows you to personal and management all person information as an alternative of trusting a 3rd social gathering with these delicate items of knowledge. Additionally, Moralis is suitable with any tech stack. Nonetheless, the Moralis Web3 Auth API is suitable with OpenID, OAuth, DIDs, and different requirements. Furthermore, all it takes to make use of this software is to get your API key.
Which kind of person is Moralis’ backend Web3 authentication performance for? Properly, it’s for everybody thinking about constructing new Web3 apps the simple method. It’s additionally for devs that wish to join their current Web2 person databases utilizing Web3 authentication. Moreover, Moralis’ backend Web3 authentication allows you to use aggregators corresponding to Auth0 to your enterprise Web3 auth flows. As well as, this neat answer additionally solves many of the widespread Web3 auth issues. Thus, you do not must:
- Perceive Web3 authentication flows
- Grasp various pockets requirements
- Redirect customers to third-party auth interfaces
- Learn the way wallets signal or confirm messages
- Continuously replace and preserve the auth answer
- Uncover how wallets work on completely different blockchains
- Assume duty for the auth answer’s safety

Nonetheless, Moralis can be cross-chain interoperable. Therefore, you get to focus on all main programmable blockchains. Consequently, this provides you extra attain and future-proofs your sign-up flows. So, if you wish to flip months of labor right into a job so simple as copying and pasting one line of code, give Moralis’ Web3 authentication a attempt. With this unified API, you’ll simply cowl all Web3 authentication strategies.

Why Use Subsequent.js?
When you’ve got labored with JavaScript earlier than, you might be most likely acquainted with React. Moreover, Subsequent.js is lots like React; nonetheless, it allows you to create your backend inside the identical repository. As such, you’ll be able to simply cowl each the frontend and backend in a single place. This implies you’ll be able to seamlessly combine the Moralis backend performance into your Subsequent.js utility. So, all now we have to do is use our Subsequent.js frontend to make a submit request to our Subsequent.js backend. In fact, it will likely be Moralis’ backend Web3 authentication that may deal with Web3 logins.

Combine Backend Web3 Authentication Performance with Subsequent.js and Moralis
Earlier than we present you methods to set up a starter Subsequent.js mission, let’s take a more in-depth have a look at a demo of our completed instance dapp. Wanting on the screenshot under, you’ll be able to see that we saved issues fairly easy. In spite of everything, the purpose of this tutorial is to point out you the backend Web3 authentication performance. So, to authenticate themselves utilizing their MetaMask wallets, customers must click on on the “Authenticate by way of MetaMask” button:
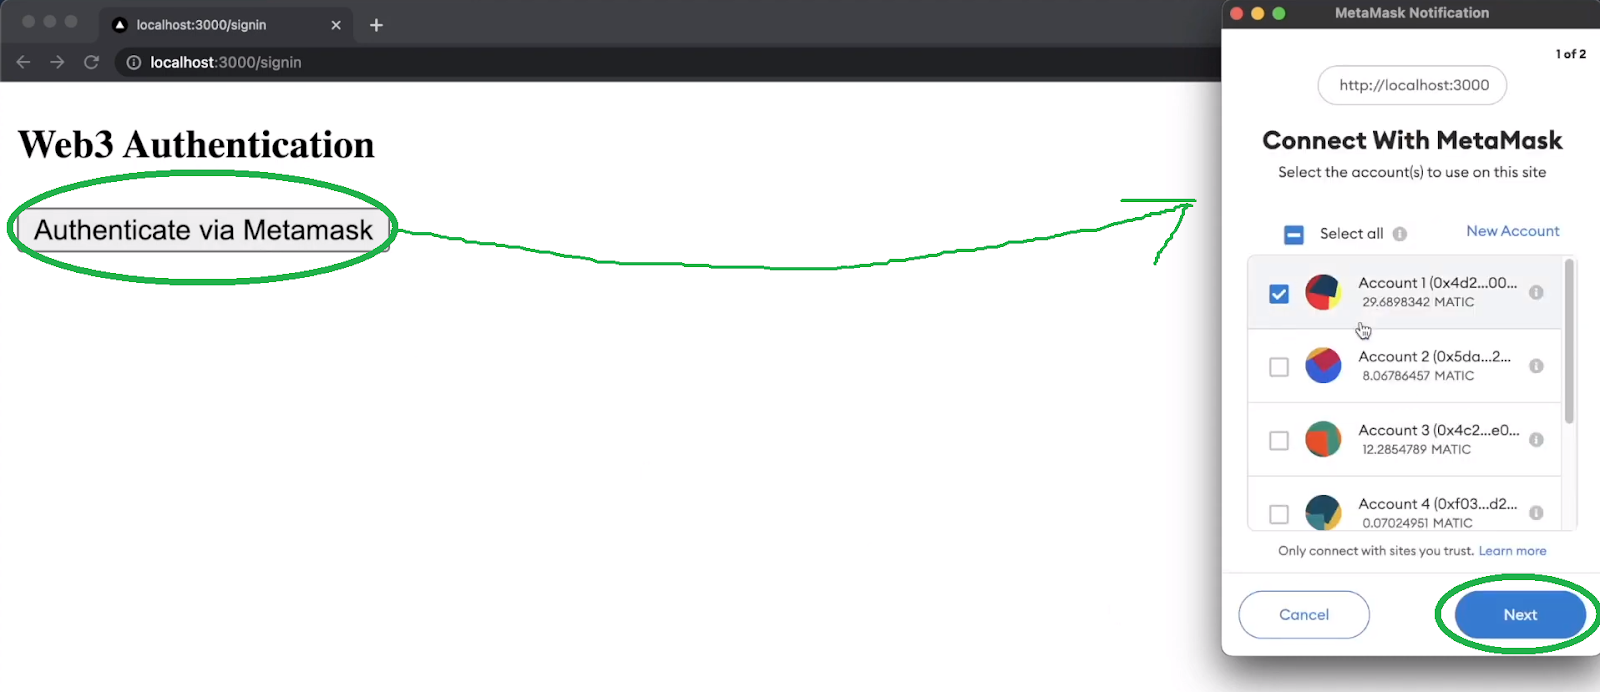
As you’ll be able to see within the picture above, the button prompts customers’ MetaMask extensions. First, customers must click on on the “Subsequent” button. On the second step, they should click on on “Join”:

After clicking on the “Join” button, MetaMask pops up a signature request. Right here, customers must click on on the “Signal” button and eventually full their Web3 authentication course of:

Final however not least, we additionally coded our instance dapp to show sure particulars as soon as customers change into authenticated:

Furthermore, as soon as signed in, customers can see the “Signal out” button that permits them to disconnect their wallets from our dapp. The main points that our dapp shows include customers’ addresses, profile IDs, and signature hashes. Nonetheless, it’s essential to notice that utilizing Moralis’ SDK permits you to effortlessly embody any on-chain information and evolve your dapp additional.
Now that what we’ll be constructing let’s undergo the steps that may take you from begin to end.
Create a New Subsequent.js Undertaking
We advocate you observe our lead and open Visible Studio Code (VSC). There, create the “Moralis” folder and open a brand new terminal. Then, use the “npx create-next-app” command and identify your app:

Subsequent, navigate to the above-created mission utilizing the “cd web3auth” command. You additionally want to put in some dependencies, so use the “npm set up moralis next-auth axios” command:
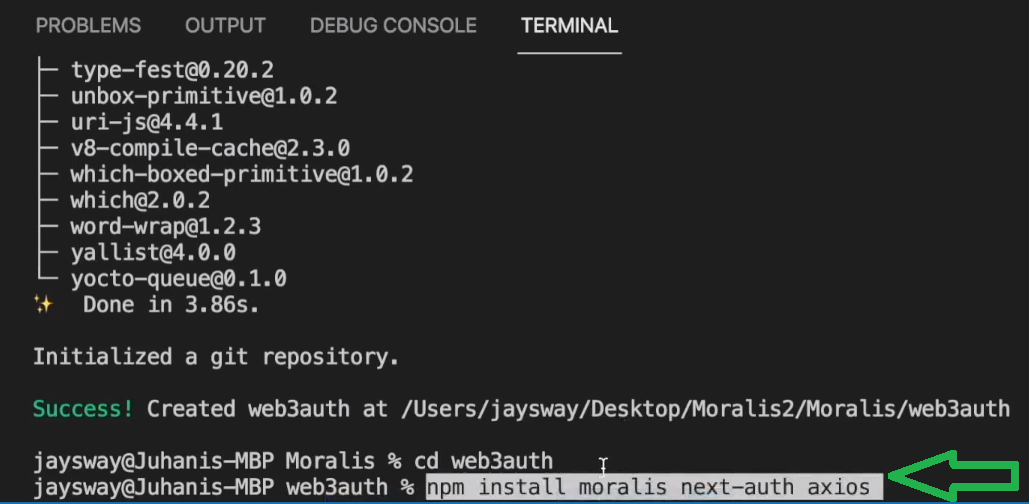
By putting in the above three dependencies, you’re going to get entry to:
- The Moralis SDK (“moralis”)
- An authentication bundle for Subsequent.js (“next-auth”)
- Making requests out of your Subsequent.js frontend to your Subsequent.js backend (“axios”)
Moreover, you additionally want a Web3 library to entry Web3 performance, corresponding to an built-in pockets in your browser. For this goal, we will use the “wagmi” and “ethers” packages:

The above command additionally concludes our dependencies setup. So, now you’ll be able to have a look at the information contained in the above-created Subsequent.js mission:
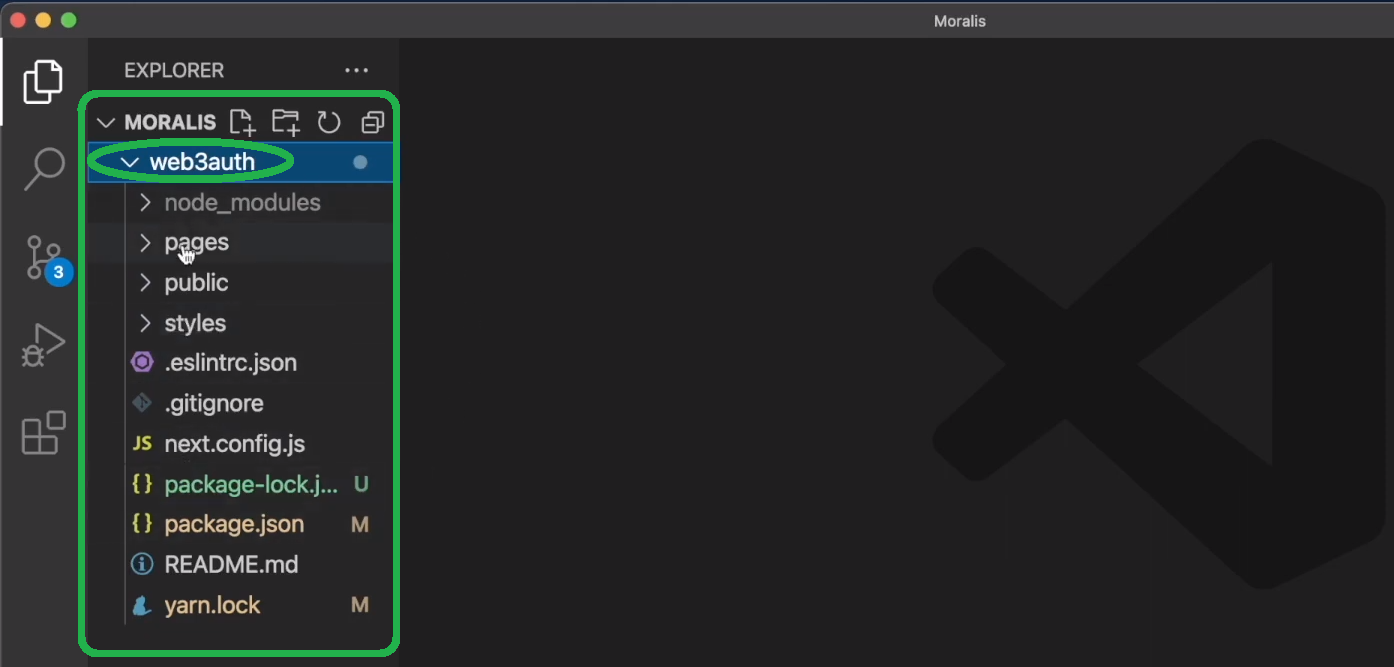
Wanting on the screenshot above, you need to see the “pages” folder. The latter accommodates all of the important information that we are going to give attention to shifting ahead:
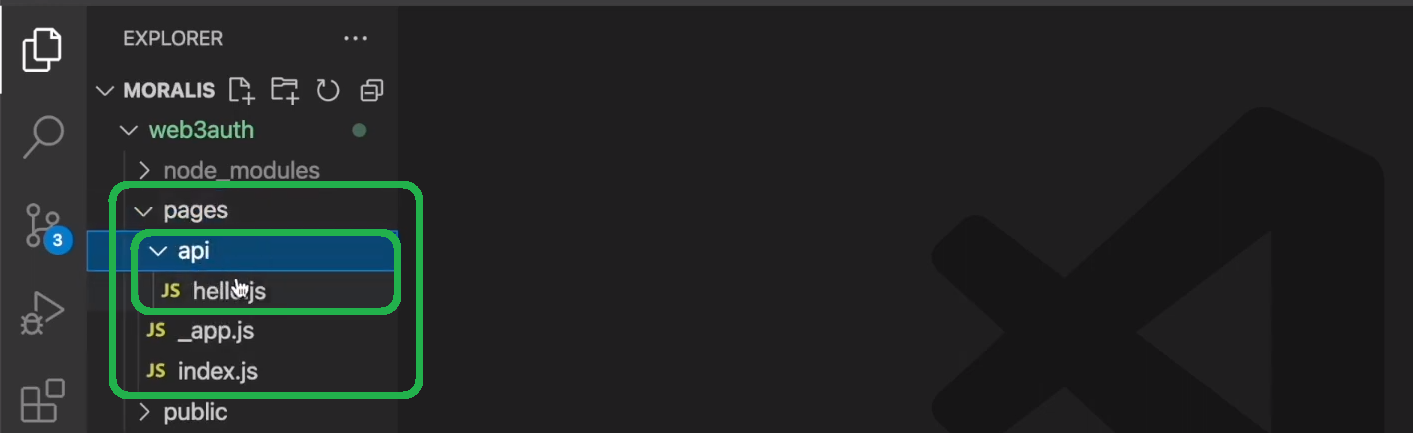
Furthermore, the “api” folder accommodates all of the backend-related data. However, the “_app.js” and the “index.js” information are your utility’s frontend.
The Communication Between Subsequent.js Frontend and Backend
To see how our Subsequent.js frontend communicated with our Subsequent.js backend, open the “index.js” file and delete every little thing besides the outermost div. Then, add the “Get Title” button to that div:

As well as, additionally be certain that so as to add the “getName” async perform. The latter will name the “hiya.js” file and console log the output:

Again within the “index.js” file, import “axios” by including the ‘import axios from “axios”‘ line of code. Moreover, additionally be certain that to outline the response and console log it:

To view the above code in your “localhost:3000“, use the “npm run dev” command. For extra particulars, use the video under, beginning at 4:49. Now that you know the way to make use of Subsequent.js, it’s time to create the above-presented instance dapp. Therefore, you’re going to get to place Subsequent.js and Moralis’ backend Web3 authentication performance to make use of.
Easy Frontend to Backend Web3 Authentication Performance
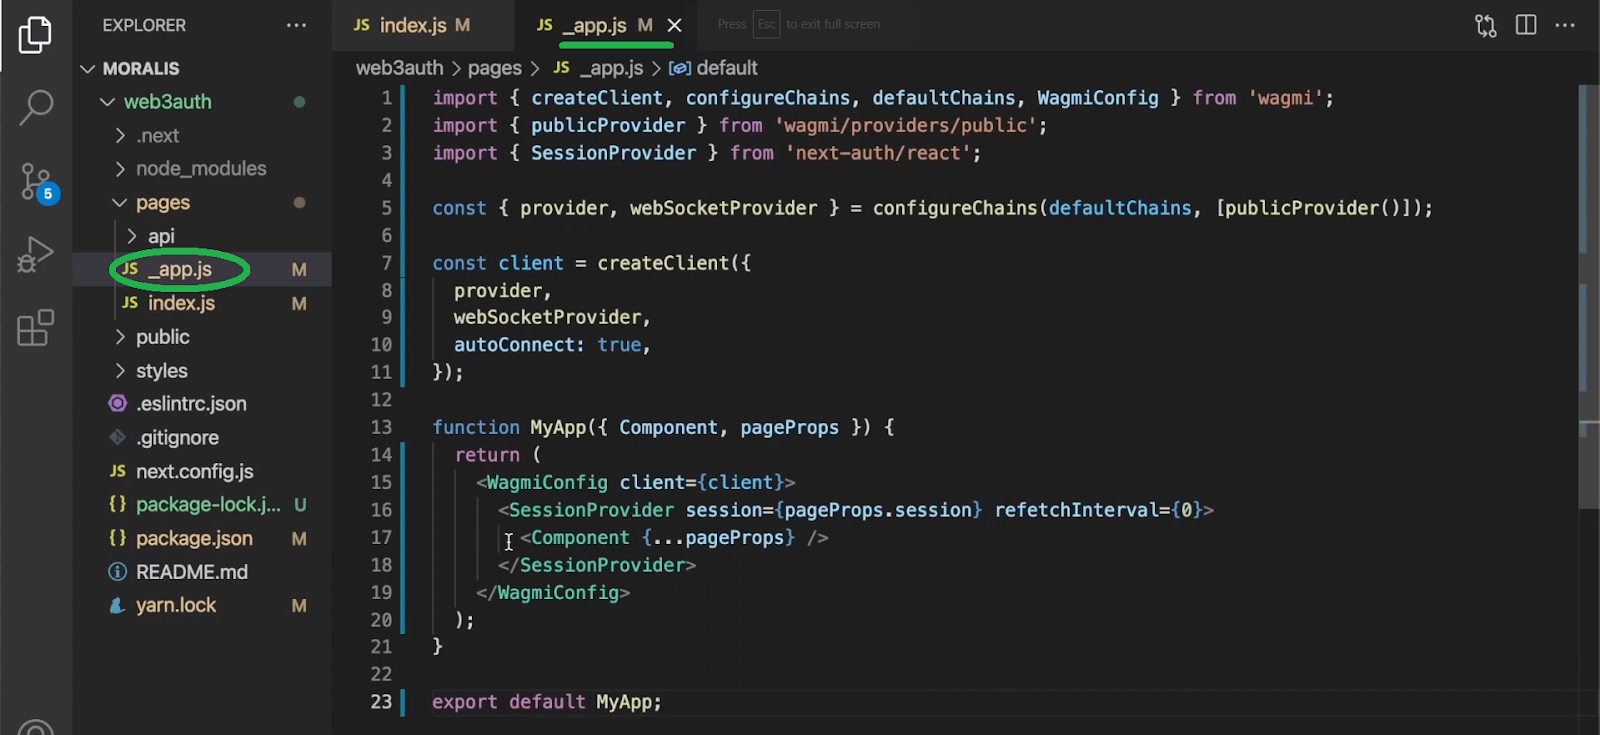
On this part, you’ll study to create the easy frontend for our instance dapp. For that goal, you’ll use the “_app.js” file. Additional, you’re going to get to repeat many of the code from the “Sign up With MetaMask” web page from the Moralis documentation. So, begin by changing the present content material within the “_app.js” file with the code underneath step 4. Simply use the “copy” icon”:
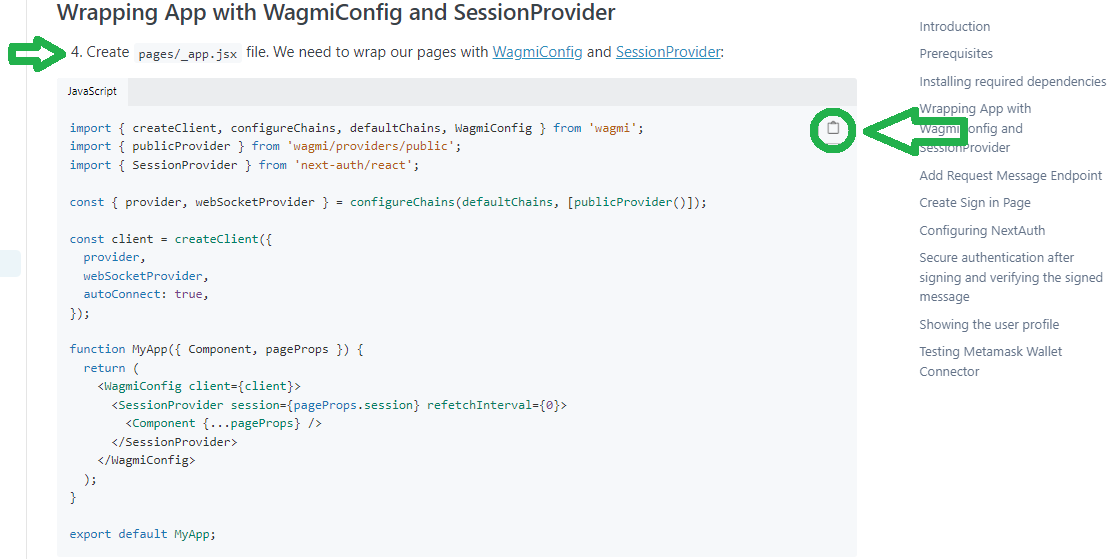
Then return to the “_app.js” file and paste the above-copied code:
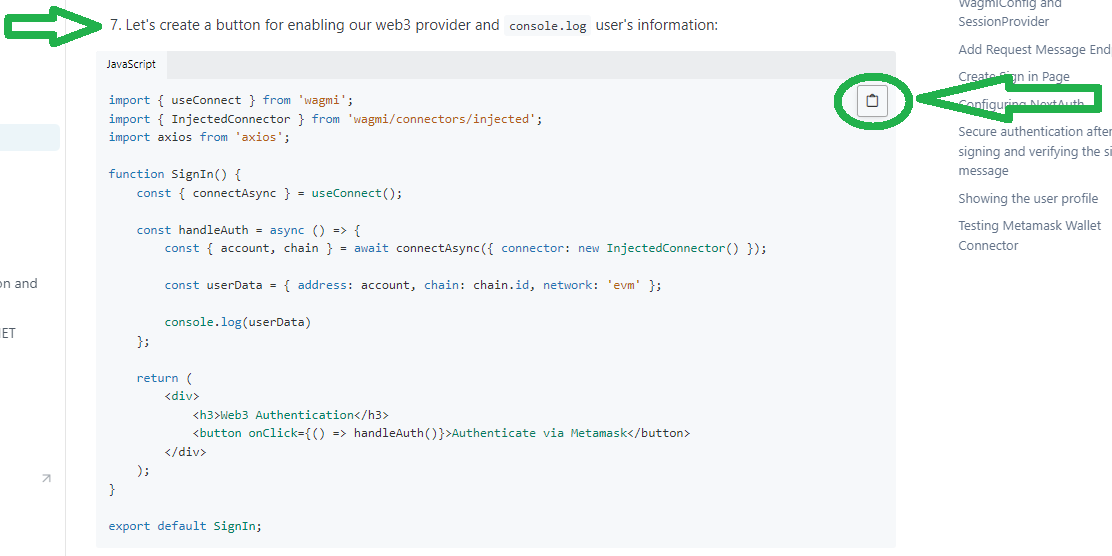
Subsequent, you’ll create two extra pages. First, create the “check in” web page, which would be the web page that may allow customers to check in. Paste within the code from the above documentation web page, step seven:
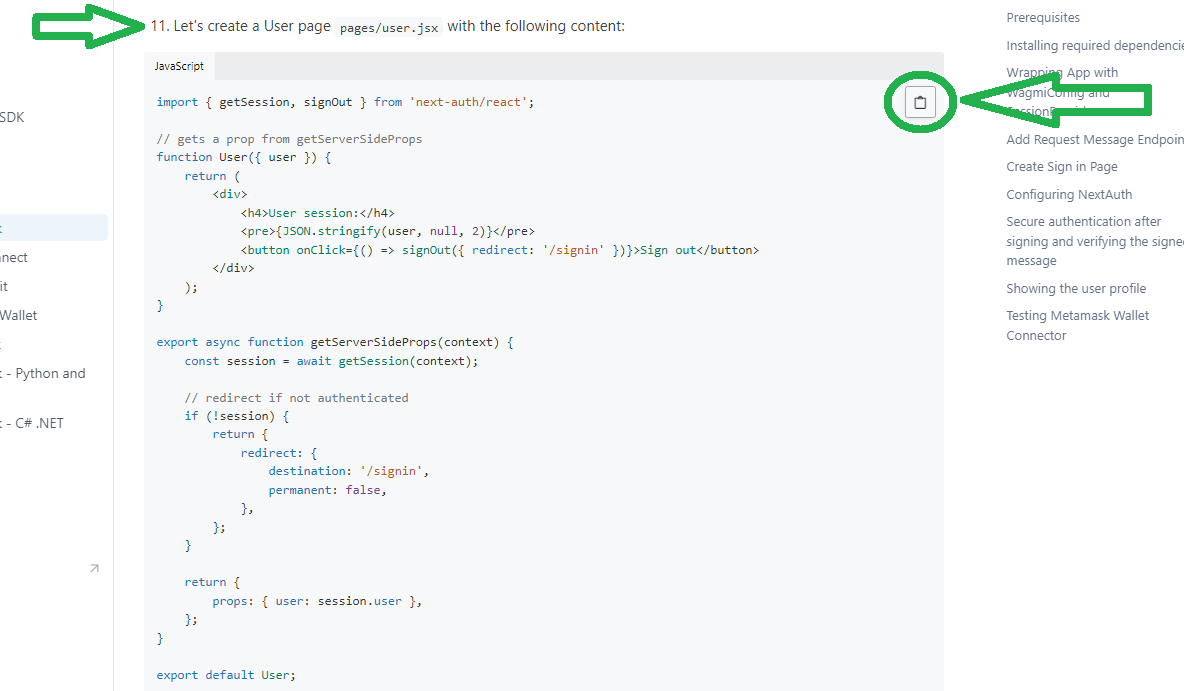
One other web page for our frontend is the “person” web page. That is the web page on which customers can be redirected as soon as logged in. Once more, use the above-linked Moralis documentation web page and duplicate the code underneath step eleven:
Notice: For a extra detailed code walkthrough, use the video on the finish of this text, beginning at 5:50.
Implementing Backend Web3 Authentication Performance
With our easy frontend pages in place, it’s time to construct a correct backend logic. Basically, we have to request Moralis to ship us a sign-in message. Then, after customers signal the message, we additionally want to make use of Moralis to confirm that sign-in message. Furthermore, after profitable verification, our backend must create an authenticated person, whose particulars can be displayed on the “person” web page.
Begin by heading to the “api” folder in Visible Studio Code and delete the “hiya.js” file. Then, create a brand new folder referred to as “auth” contained in the “api” folder. Additionally, be certain that to create the “.env.native” file contained in the “web3auth” folder:

For extra particulars in regards to the environmental variables, use step three on the above documentation web page. Wanting on the variables above, you’ll be able to see that that is the place it is advisable paste your Moralis Web3 API key. To get it, you’ll must create your free Moralis account. Then, click on on the profile icon within the top-right nook (“1” within the picture under) of your Moralis admin space. Subsequent, click on on “Account Settings”. As soon as on the “Account Settings” web page, choose the “Keys” tab, the place you’ll be capable of copy your Web3 API key:

Lastly, don’t overlook to stick your API key into the designated line of the “.evn.native” file.
Creating Our Backend Information
Now, navigate to the above-created “auth” file and create the “request-message.js” file. Once more, no must sort the code; simply use the above documentation web page and duplicate the code on step 5:

With the intention to match the message in our demo, change the “Please signal this message to verify your identification.” assertion to “web3 auth”:

Notice: For an in depth code walkthrough, use the video under, beginning at 11:00.
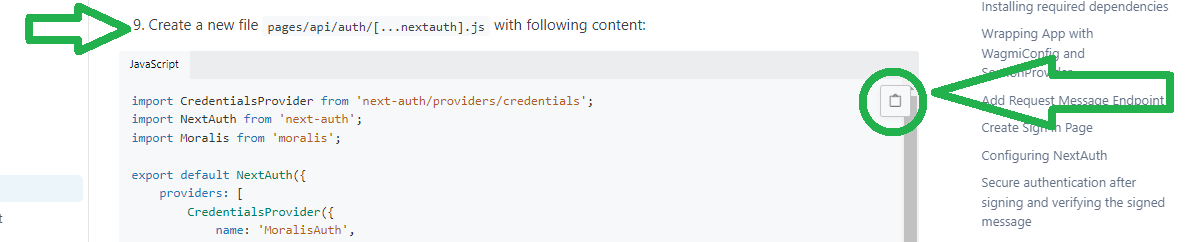
Nonetheless, we have to create one other endpoint to authenticate customers after they signal the preliminary message. For that goal, create the “[…nextauth].js” file contained in the “auth” folder and paste within the code from the identical Moralis documentation web page (step 9):
Lastly, it is advisable return to the “signin.js” file and add the calls to the above-created endpoints, that are an important a part of our backend Web3 authentication performance. To make this as easy as potential, choose your complete content material and exchange it with the strains of code from the documentation web page (step ten):

With this last piece in place, you’ll be able to run your occasion of our instance dapp, which ought to work as offered above. Final however not least, right here’s the video tutorial that we’ve been referencing all through the article:
Combine Backend Web3 Authentication Performance – Abstract
At this time, you had an opportunity to discover ways to use an open-source internet improvement framework, Subsequent.js, to create a easy dapp. Because of Subsequent.js, you had been in a position to make use of the identical repository for the frontend and backend components of your utility. You additionally discovered methods to combine backend Web3 authentication performance effortlessly. The latter is feasible because of the Moralis Web3 Auth API, which is at your disposal without spending a dime. All it takes is so that you can create your free Moralis account and procure your Web3 API key. In fact, you discovered how to do this as properly. In the end, you discovered methods to create a easy dapp which will function a gateway into the Web3 realm. Now, it’s as much as you so as to add extra superior Web3 performance.
Nonetheless, for those who don’t have your personal concepts but, we encourage you to construct your expertise and confidence by finishing different instance tasks. You’ll find a ton of incredible tutorials on the Moralis weblog and the Moralis YouTube channel. Moreover, these two retailers can function your free steady blockchain improvement training. Although, if you’re desperate to take your backend Web3 authentication expertise to a different degree in an expert method, enrolling in Moralis Academy may be the proper path for you. Apart from a personalised research path and top-tier crypto programs, that is the place to affix probably the most unimaginable crypto communities. In fact, that is additionally the place to change into blockchain licensed and go full-time crypto sooner moderately than later.


