
Solana is a programmable blockchain, which means that the community helps sensible contracts, which is the place we are going to direct our consideration on this article. Extra particularly, this text will present you methods to write a Solana sensible contract very quickly! Moreover, together with illustrating methods to write a Solana sensible contract, this text will additional cowl methods to deploy and run the contract utilizing a easy check software. To make this extra accessible, we are going to use Moralis’ Ethereum boilerplate, permitting us to launch the applying with little to no effort. However this would possibly sound complicated since it’s an Ethereum template; nevertheless, fear not, the Ethereum boilerplate is Solana suitable!
The accessibility of writing, deploying, and calling the Solana sensible contract originates partly from the enterprise-grade Web3 APIs provided by Moralis. If you wish to be taught extra about these glorious growth instruments, we’d, as an example, suggest testing the Solana API, permitting you to create refined Solana initiatives with ease. For instance, with the API, you may shortly discover ways to construct a Solana NFT explorer.
However, with a purpose to observe alongside on this ”The best way to Write a Solana Sensible Contract?” tutorial, you’ll need a Moralis account. Thus, in case you have not already, join with Moralis immediately! It will present quick entry to the platform’s varied APIs, making all of your future growth endeavors extra accessible!
What’s a Solana Sensible Contract?
Briefly, a Solana sensible contract is a contract operating on the Solana community. Nonetheless, to reply the ”what’s a Solana sensible contract?” query extra adequately, it may be a good suggestion to start by diving into the intricacies of Solana and sensible contracts individually. So, let’s provoke this text by taking a more in-depth take a look at the Solana community!

Solana was first launched in 2017 by Solana Labs, which is the group behind the community. Solana is an open-source, programmable blockchain, indicating that the community helps sensible contracts. The blockchain emphasizes pace and scalability as Solana can course of transactions extra economically and sooner than, for instance, Ethereum.
The native forex of Solana is named SOL, which is used to maintain the community secure and safe. Furthermore, one issue making the blockchain distinctive is that Solana implements two consensus mechanisms: PoH (proof-of-history) and PoS (proof-of-stake). This hybrid consensus mechanism permits Solana to maintain transaction speeds excessive whereas conserving prices low.
With a short understanding of Solana, it’s time to dive deeper into sensible contracts. As such, allow us to attempt to reply the query, ”what are sensible contracts?”.
Sensible contracts, additionally known as Web3 contracts, are packages saved on a blockchain community. These packages execute predefined actions as quickly as predefined situations meet. Consequently, sensible contracts are perfect for automating agreements between two or extra actors so that every participant could be sure of explicit outcomes. Furthermore, since code mediates sensible contracts, it means that individuals don’t want to fret about intermediaries or pointless losses.
Within the context of Solana, sensible contracts are basically contracts saved on the Solana community. Now, with that lined, allow us to take a more in-depth take a look at how one can write a Solana sensible contract!
Write a Solana Sensible Contract – Full Breakdown
Now that you’re extra acquainted with Solana sensible contracts, the next sections will dive deeper into Solana sensible contract growth. We’ll present you methods to write, deploy, and name a sensible contract from a testing software as we transfer ahead. The applying will probably be an easy ”Hiya World!” venture the place customers can push a ”Run Program” button to name the sensible contract. Furthermore, that is what the UI (consumer interface) appears like:

The applying makes use of the Ethereum boilerplate from Moralis, permitting us to construct this testing software for sensible contracts extra effectively. For instance, the template options Moralis’ Web3 Auth API, permitting us to simply implement varied authentication mechanisms. If you wish to be taught extra concerning the completely different options, you may, as an example, try our information on methods to add an indication in with RainbowKit!
However, as soon as the customers click on on the ”Run Program” button above, it ought to immediate their Web3 pockets, permitting them to name the sensible contract by signing a message. As soon as signed, the app will return the info log from the sensible contract. On this case, the app returns a ”Hiya World!!” message:

To make the construction of this tutorial much more simple, we’ve divided the method of writing a Solana sensible contract into the next three sections:
- Putting in Rust and the Solana CLI
- Creating and Deploying the Sensible Contract
- Calling the Sensible Contract – The Testing App
It’s value noting that we’ll be utilizing a macOS machine all through the article. Consequently, in case you have Home windows, do not forget that the method would possibly often differ. Nonetheless, if this sounds attention-grabbing and also you need to write a Solana sensible contract by yourself, be part of us and be taught every thing you want about Solana sensible contract growth!
Putting in Rust and the Solana CLI
On this preliminary part of the tutorial, we are going to showcase methods to arrange Rust and the Solana CLI. If you have already got these put in, be at liberty to skip this half and bounce straight into the next part. In any other case, be part of us as we are going to start by exhibiting you methods to arrange Rust.
To start with, go forward and open a brand new Unix terminal and run the next command:
curl --proto '=https' --tlsv1.2 -sSf https://sh.rustup.rs | sh
When you run the command, you need to decide between a number of set up varieties. On this occasion, we suggest choosing the default choice by inputting ”1” and hitting enter:

As soon as Rust efficiently installs, the subsequent step is putting in the Solana CLI. To put in the CLI, you’ll solely want a few instructions, and you’ll start by inputting the next into the terminal and hitting enter:
sh -c "$(curl -sSfL https://launch.solana.com/secure/set up)"
When the set up finalizes, you might want to set the ”env path”, which yow will discover within the terminal logs.

From there, create a brand new native Solana key pair by means of these instructions:
mkdir ~/my-solana-wallet
solana-keygen new --outfile ~/my-solana-wallet/my-keypair.json
Upon getting a Solana pockets in your machine, purchase the pockets handle by means of the next enter:
solana handle
Set the devnet cluster to make use of with native transactions by inputting this command:
solana config set --url https://api.devnet.solana.com
Lastly, airdrop check SOL tokens to the pockets by operating this command within the terminal:
solana airdrop 1
Now that’s it for this preliminary part of this tutorial. We’ll now dive deeper into the central a part of the tutorial and present you methods to write a Solana sensible contract!
Creating and Deploying the Sensible Contract
It’s now time to put in writing a Solana sensible contract. To provoke this course of, go forward and open your most well-liked IDE. We’ll use VSC (Visible Studio Code); nevertheless, you’re free to decide on any IDE you may be extra comfy working with. With an IDE open, create a brand new folder and launch a brand new terminal. When you, like us, use VSC, you are able to do so by clicking on ”Terminal” on the prime and hitting ”New Terminal”:

Subsequent up, create a brand new Rust venture with Cargo by inputting the command beneath into the terminal:
cargo init hello_world --lib
When you hit enter and run the command, it is going to lead to an easy Cargo library, which will probably be added to your IDE’s listing. Here’s what it is going to appear like in VSC:

From there, go forward and navigate to the proper location with this command:
cd hello_world
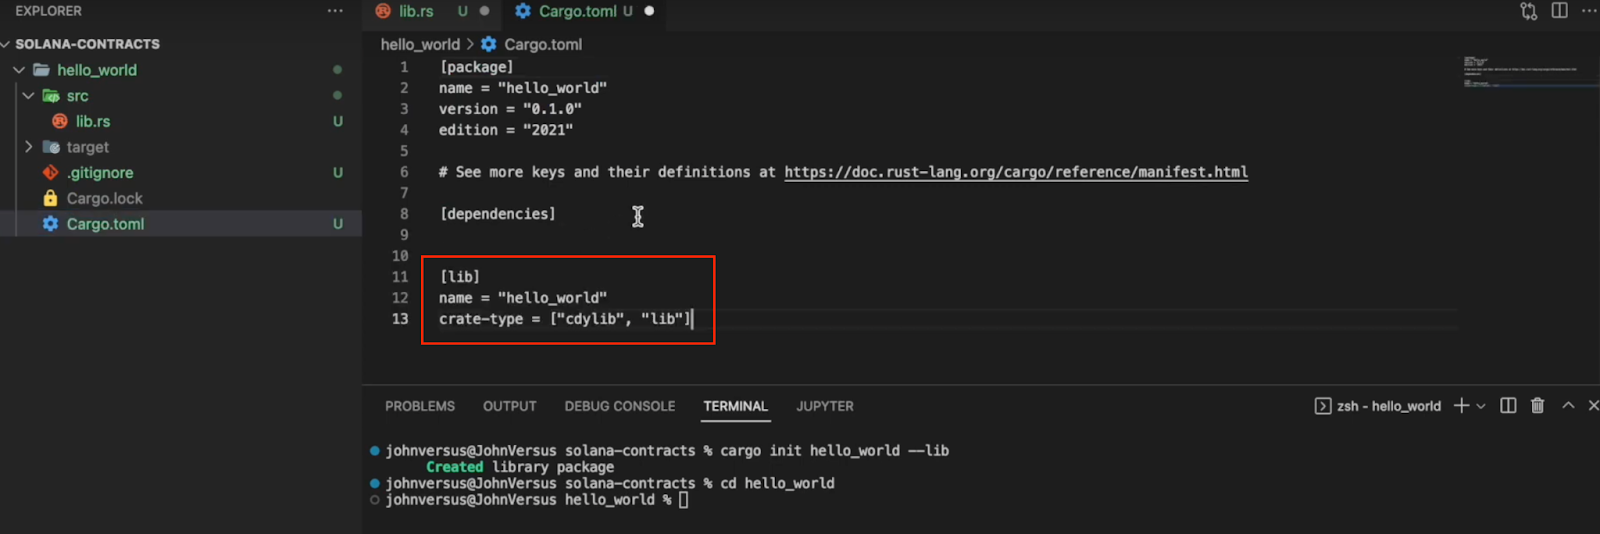
You may then proceed by updating the ”Cargo.toml” file by including the code snippet beneath:
[lib]
identify = "hello_world"
crate-type = ["cdylib", "lib"]
It ought to now appear like this:
Subsequent up, take away all of the code throughout the ”src/lib.rs” file. From there, you may add the Solana program bundle to the venture by operating this command:
cargo add solana_program
All that is still is including the contract code to the ”src/lib.rs” file. First up, you might want to import the Solana program:
use solana_program::{
    account_info::AccountInfo,
    entrypoint,
    entrypoint::ProgramResult,
    pubkey::Pubkey,
    msg,
};
Following this, outline the “entrypoint” with the ”process_instruction” operate:
entrypoint!(process_instruction);
Lastly, create the ”process_instruction” operate itself and add the code for logging the ”Hiya World!!” message:
pub fn process_instruction(
    program_id: &Pubkey,
    accounts: &[AccountInfo],
    instruction_data: &[u8]
) -> ProgramResult {
    msg!("Hiya, world!");
    Okay(())
}
This would be the code for the ultimate model of the ”src/lib.rs” file:
use solana_program::{
    account_info::AccountInfo,
    entrypoint,
    entrypoint::ProgramResult,
    pubkey::Pubkey,
    msg,
};

entrypoint!(process_instruction);
pub fn process_instruction(
    program_id: &Pubkey,
    accounts: &[AccountInfo],
    instruction_data: &[u8]
) -> ProgramResult {
    msg!("Hiya, world!");
    Okay(())
}
From there, construct the venture by inputting the next command into the terminal:
cargo build-bpf
As soon as the venture is constructed, deploy the sensible contract by means of the “solana program deploy” command and specify the ”./goal/deploy/hello_world.so” path:
solana program deploy ./goal/deploy/hello_world.so
Operating this may return this system ID, which you’ll need within the final part:

Calling the Sensible Contract – The Testing App
On this final part, we are going to present you methods to create the applying you should utilize to name and check the Solana sensible contract you simply created. We’ll clone an already-developed template to make the method as seamless as attainable. From there, you solely have to configure the code barely by including your Moralis Web3 API key and this system ID. However, you’ll find the GitHub repository for the app beneath:
Solana Sensible Contract Take a look at App Docs – https://github.com/johnvsnagendra/solana-smart-contract-helloWorld
First up, open the hyperlink above, click on on the inexperienced ”Code” button, and duplicate the repository URL:

You may then, as soon as once more, open your favourite IDE, create a folder, and launch a brand new terminal. From there, clone the venture to your native listing by inputting the next command utilizing the repo URL:
git clone “REPOSITORY_URL”
Upon getting cloned the venture, open the ”.env.native.instance” file containing a number of atmosphere variables. On this case, you might want to add your Moralis Web3 API key to the ”MORALIS_API_KEY” variable. To get the important thing, log in to Moralis. Then, navigate to ”Account”, choose the ”Keys” tab, and duplicate the Web3 API key:

With the API key added to the atmosphere variables, you may navigate to the ”/src/elements/templates/helloWorld/HelloWorld.tsx” file. From there, scroll all the way down to the nineteenth line and implement this system ID you acquired when deploying the contract.

Testing the App
Upon getting added these two elements to the code, it is best to have the ability to launch and check the applying in your browser. Furthermore, if every thing works, it is best to now have the ability to click on on the ”Run Program” button, signal a message, and run the sensible contract. Additionally, it is best to obtain the ”Hiya World!!” message!

In case you are on the lookout for a extra detailed breakdown of the entire code for the check software, try the YouTube clip beneath. On this video tutorial, a developer offers a extra detailed walkthrough of your entire code. In flip, it ought to hopefully reply any of your questions. Furthermore, you may also be part of Moralis’ Discord channel and get glorious steering from our group engineers!
Abstract – The best way to Write a Solana Sensible Contract?
This text illustrated methods to write, deploy, and name a Solana sensible contract. To name and check the contract, the article showcased methods to construct a easy testing app utilizing Moralis’ Ethereum boilerplate. Furthermore, because of the accessibility of Moralis, you have been capable of write, deploy, and name a Solana sensible contract in solely three steps:
- Putting in Rust and the Solana CLI
- Creating and Deploying the Sensible Contract
- Calling the Sensible Contract – The Testing App
Following the steps above allowed you to put in writing a Solana sensible contract, deploy it to the Solana devnet, launch an software and name the sensible contract. Additionally, you might name and check the sensible contract by means of the app with a easy click on of a button. As soon as clicking on the button within the app’s UI, it prompts your Web3 pockets to signal a message and name the sensible contract. In flip, a ”Hiya World!!” message ought to present up.

When you discovered this text useful, take a more in-depth take a look at some extra content material right here at Moralis’ Web3 weblog. For instance, in case you are concerned with creating dapps for different networks, you’ll find that Moralis is the quickest technique to construct a Web3 app. If this excites you, try our guides explaining methods to construct dapps utilizing Moralis’ Polygon boilerplate and BNB Chain boilerplate! Moreover, try methods to use the main Web3 web site template for quite a few networks! As well as, if you wish to concentrate on NFTs, be sure to take a look at the multichain NFT API. With it, you may construct cross-chain NFT dapps shortly and simply!
So, irrespective of if you wish to write a Solana sensible contract or construct extra refined Web3 initiatives, join with Moralis instantly and entry a extra accessible developer expertise!


